If your mower belt is worn out or slipping, it can make your lawn care frustrating and slow. Knowing how to install a mower belt correctly can save you time, money, and the hassle of frequent repairs.
In this guide, you’ll learn simple, step-by-step instructions to replace your mower belt with ease. Whether you’re a beginner or just need a quick refresher, this article will help you get your mower running smoothly again—fast. Keep reading to discover the tips and tricks that make belt installation straightforward and stress-free.
Choosing The Right Belt
Choosing the right mower belt is crucial for your mower’s performance and longevity. A belt that doesn’t fit well can slip, wear out fast, or even damage other parts. Before you grab any belt, you need to know exactly what your mower requires.
Check Your Mower Model
Every mower model has specific belt requirements. Start by looking at your mower’s manual or the manufacturer’s website. You’ll find details about the belt type and size there.
If you don’t have the manual, check the belt itself for any printed numbers or codes. These markings often indicate the belt size and model, helping you find an exact match.
Types Of Mower Belts
Not all mower belts are the same. You’ll typically encounter:
- V-belts: Shaped like a “V” and fit into pulleys with a matching groove.
- Flat belts: Smooth and flat, used in older or specialty mowers.
- Ribbed belts: Have multiple grooves on the underside, offering better grip.
Using the wrong belt type can cause slipping or damage. If your mower manual isn’t clear, match the belt you remove with a new one at the store.
Measuring Belt Size
Accurate measurement is key to getting the right belt. If your old belt is missing or damaged beyond recognition, you’ll need to measure manually.
Use a flexible tape measure to find the belt’s length by wrapping it around the pulleys it connects. Measure the width and thickness too—these dimensions are just as important.
Remember, a belt that’s too tight can strain the mower, while one that’s too loose won’t transfer power effectively. If you’re unsure, take your measurements or the old belt to a local hardware store for expert help.

Credit: www.doityourself.com
Preparing The Mower
Preparing the mower before installing a new belt is essential. This step ensures safety and makes the installation easier. Proper preparation helps avoid damage and saves time during the process.
Safety Precautions
Disconnect the spark plug wire to prevent accidental starts. Wear gloves to protect your hands from sharp edges. Work on a flat, stable surface to keep the mower steady. Make sure the mower is cool before starting any work.
Gathering Tools
Collect all necessary tools before beginning. Common tools include:
- Socket wrench set
- Screwdrivers (flathead and Phillips)
- Pliers
- Replacement belt
- Work gloves
Having everything ready avoids interruptions during the installation.
Accessing The Belt Area
Remove the mower deck or cover to reach the belt. Check your mower’s manual for specific instructions. Use the appropriate tools to remove bolts or clips carefully. Keep all removed parts in a safe place to avoid losing them. Clear any grass or debris around the belt area to work easily.
Removing The Old Belt
Removing the old mower belt is a crucial step before installing a new one. It sets the stage for smooth operation and prevents damage to your mower. Understanding how to release tension, remove belt guards, and take out the old belt can save you time and frustration.
Releasing Tension
The mower belt stays tight because of the tensioner pulley. You need to release this tension to slip off the old belt easily. Use a wrench or socket to move the tensioner arm away from the belt, which loosens it.
Be careful not to let the tensioner snap back suddenly; it can cause injury or damage parts. If you’re unsure, try gently pushing the pulley by hand first to understand its movement.
Removing Belt Guards
Belt guards protect the belt and other moving parts, but they also block access. Locate the screws or bolts holding the guards in place. Use the appropriate screwdriver or wrench to remove them and set the guards aside safely.
Keep all hardware in a small container so nothing gets lost. Missing a screw later can cause rattling or safety risks when the mower runs.
Taking Out The Old Belt
With tension released and guards off, the old belt should slide off the pulleys. Sometimes belts get stuck due to dirt or wear, so wiggle it gently if needed. Avoid using excessive force, as this might damage the pulleys or other components.
Inspect the belt for cracks, fraying, or glazing to understand why it needed replacement. Have you ever noticed unusual noises or slipping before? These signs often point to belt problems.

Credit: www.doityourself.com
Installing The New Belt
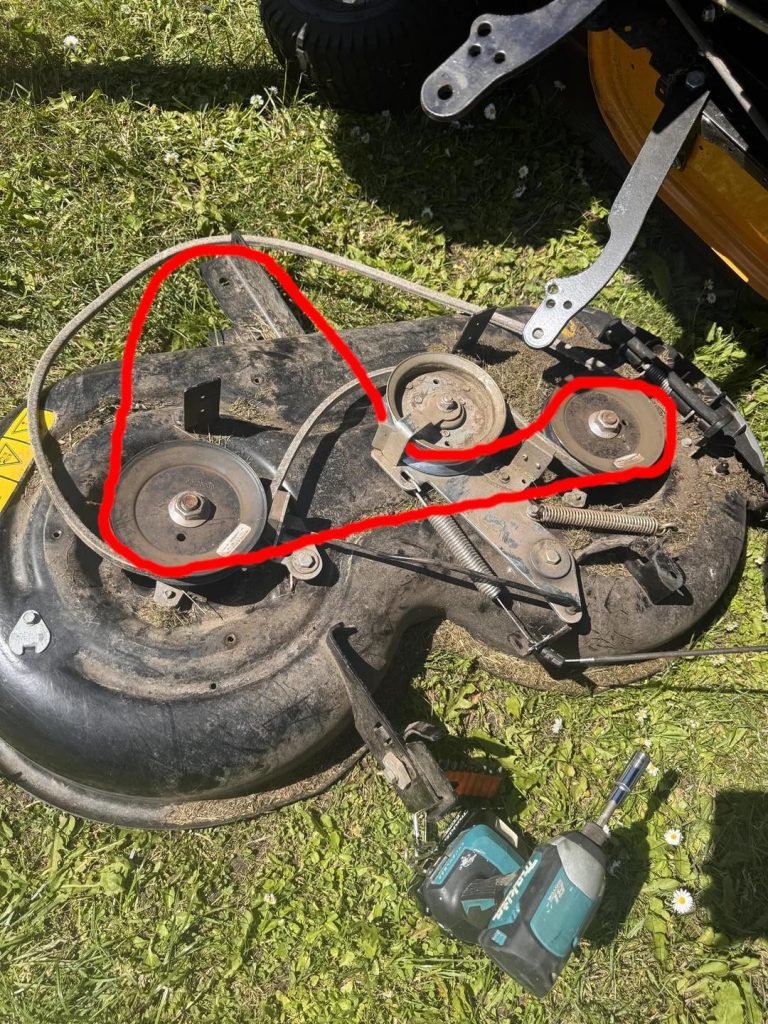
Place the new mower belt carefully on the pulleys, following the belt path diagram. Ensure it fits tightly without twists for smooth operation. Check the tension and adjust if needed before starting the mower.
Installing the New Belt Replacing a mower belt might seem daunting, but with a bit of patience and the right guidance, it’s a task that anyone can master. The key is to ensure the belt is positioned and routed correctly to maintain optimal performance. Let’s break down the installation process into manageable steps that will have your mower running smoothly in no time.Positioning The Belt Correctly
Begin by placing the new belt around the appropriate pulleys. Make sure it is seated properly in each groove to prevent slipping or damage. Double-check that the belt is not twisted or misaligned, as this can affect its efficiency. A neat trick is to take a photo of the old belt’s positioning before removal. This visual reference can be a lifesaver during installation.Routing Around Pulleys
Routing the belt correctly is crucial for smooth operation. Follow the belt routing diagram typically found in your mower’s manual. If you don’t have the manual, many manufacturers offer diagrams online. Ensure the belt is looped around each pulley in the correct sequence. Missing a pulley or routing incorrectly can lead to belt failure.Adjusting Belt Tension
Proper belt tension ensures your mower operates efficiently without unnecessary wear. Most mowers have an adjustment mechanism, often a spring or bolt, to set the tension. Check the belt tension by pressing down on it; it should have a slight give but not be too loose. If you notice the belt slipping during operation, revisit the tensioning process to make necessary adjustments. By focusing on these steps, you’ll not only extend the life of your mower but also enhance its cutting performance. Have you encountered any challenges during a belt installation? Share your experiences or tips in the comments!Testing The Installation
After installing the mower belt, testing the installation is crucial to ensure everything works smoothly. This step helps you catch any issues early, preventing damage to your mower or uneven cutting. Taking a few minutes here can save you a lot of frustration later.
Manual Rotation Check
Before starting the engine, try rotating the blade manually. This lets you feel if the belt moves freely without slipping or binding.
- Wear gloves to protect your hands.
- Turn the blade slowly in the normal cutting direction.
- Notice if there’s any unusual resistance or noise.
If the blade turns smoothly, the belt is likely seated correctly on the pulleys. If you feel stiffness or hear grinding, double-check the belt placement and tension.
Starting The Mower
Once the manual check is clear, start the mower engine in a safe, open area. Keep your hands and feet away from the blades at all times.
Listen closely to the engine and belt area. Any squealing or unusual sounds mean the belt might be slipping or too tight.
Also, watch for vibrations or smoke, which can signal incorrect installation. If you notice any of these signs, shut off the mower immediately and re-inspect the belt.
Inspecting Belt Performance
Run the mower for a few minutes to test the belt under normal load. Pay attention to how the mower cuts the grass and how the belt behaves.
- Is the belt slipping off the pulleys?
- Does the mower maintain consistent power?
- Are there any jerky movements or sudden stops?
Good belt performance means smooth, even cutting without odd noises or interruptions. If you spot any problems, adjusting belt tension or reinstalling it might be necessary.
Maintenance Tips
Proper maintenance keeps your mower belt working well and lasting longer. Regular care prevents breakdowns and saves money. Follow simple steps to maintain the belt and ensure smooth mower operation.
Regular Belt Inspection
Check the belt for cracks, frays, or wear before each use. Look for signs of slipping or damage around the edges. Replace the belt if it shows any serious wear. A quick visual check can prevent sudden failures.
Cleaning And Lubrication
Remove dirt and debris from the belt and pulleys regularly. Use a dry cloth or soft brush to clean the belt surface. Avoid using water or harsh chemicals on the belt. Lubricate the pulley bearings, not the belt, to reduce friction and noise.
When To Replace The Belt
Replace the belt if it becomes cracked, stretched, or glazed. A worn belt may slip or make noise during operation. Change the belt every season or after 100 hours of use. Timely replacement keeps the mower running efficiently and safely.

Credit: www.searspartsdirect.com
Frequently Asked Questions
How Do I Know If My Mower Belt Needs Replacement?
Check for cracks, fraying, or glazing on the belt. If the mower slips or loses power, the belt likely needs replacement.
What Tools Are Required To Install A Mower Belt?
You typically need a wrench, screwdriver, and gloves. Some models may require specific tools, so consult your mower’s manual.
Can I Install A Mower Belt Without Professional Help?
Yes, most mower belts can be replaced by following the manual. Ensure the mower is off and disconnected before starting.
How Do I Properly Align The Mower Belt?
Align the belt with all pulleys and guides. Proper tension is key—too tight or loose can cause damage.
Conclusion
Installing a mower belt right keeps your mower working well. Follow the steps carefully to avoid problems later. Check the belt’s tightness and alignment often. Replace worn belts to keep the mower cutting smoothly. A well-installed belt saves time and money on repairs.
Keep your mower ready for every mowing job. Simple care makes a big difference in performance. Now, you can mow with confidence and ease.


