Is your mower acting up or refusing to start? The problem might be right under your nose—your battery cables.
Worn-out or damaged cables can stop your mower from working properly, but fixing them is easier than you think. In this guide, you’ll learn step-by-step how to replace your mower battery cables safely and quickly. By the end, you’ll save money, avoid costly repairs, and get your mower running like new again.
Ready to take control and bring your mower back to life? Let’s dive in!
Signs Of A Faulty Battery Cable
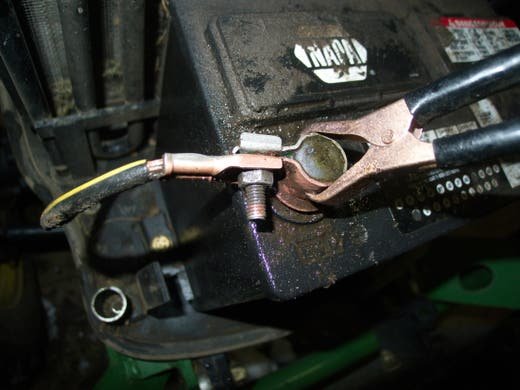
Signs of a faulty battery cableinclude slow engine start and dim lights. The mower may not start at all. Corrosion or frayed wires are visible on the cable. You may notice a burning smell or sparks near the battery. The mower’s battery might lose charge quickly.
Common symptomsto watch for:
- Engine struggles to start or won’t start
- Battery drains faster than usual
- Visible damage, cracks, or corrosion on cables
- Unusual sounds or smells near the battery
- Intermittent power loss during use
Safety precautionsare important. Always disconnect the negative cable first. Wear gloves and eye protection. Avoid touching metal parts with bare hands. Work in a dry area to prevent shocks. Use the right tools to avoid damage.
Credit: www.searspartsdirect.com
Tools And Materials Needed
Essential tools make the battery cable replacement easy and safe. Prepare a wrench setto loosen and tighten bolts. A screwdriverhelps remove cable covers. Use needle-nose pliersto grip small parts. A wire stripperis needed for cutting and stripping wires. Have a multimeterhandy to check voltage and connections. Wear protective glovesto avoid injuries.
Choosing the right replacement cables is important. Select cables that match the lengthand thicknessof the old ones. Look for cables with good insulationto prevent shorts. Copper cables offer better conductivityand durability. Double-check the cable ends fit your mower’s battery terminals. Buying cables with clear markingshelps avoid confusion during installation.
Preparing Your Mower
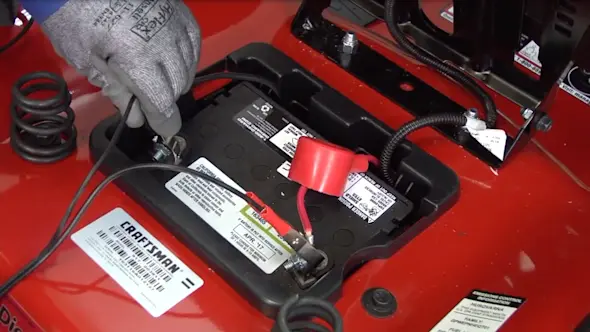
Always disconnect the batterybefore starting any work. This helps avoid electric shocksor short circuits. Use a wrench to remove the negative (-) cablefirst. Then, remove the positive (+) cable. Keep the cables away from the battery terminals to prevent accidental contact.
Place the mower on a flat, stable surface. Make sure the mower is turned offand the key is removed. Engage the parking brake if available. Avoid working on a slope to prevent the mower from moving. Ensure the area is clear of any debris or obstacles.

Credit: www.youtube.com
Removing Old Battery Cables
Start by finding the battery under the mower’s hood or near the engine. Look for two cables connected to the battery terminals. One cable is usually redand attached to the positive (+)terminal. The other cable is blackand connected to the negative (-)terminal.
Before detaching, make sure the mower is off. Use a wrench or pliers to loosen the nutsholding the cables on the terminals. Always remove the negative cable firstto avoid sparks. Then, carefully detach the positive cable. Keep the cables separate to avoid touching.
Installing New Battery Cables
Start by connecting the positive cableto the battery’s positive terminal. Make sure the cable end fits snugly over the terminal post. Next, attach the negative cableto the battery’s negative terminal. Proper connection prevents electrical issues and ensures good power flow.
Secure each connection tightly with a wrench. Loose cables can cause the mower to fail to startor lose power. Check that the cables do not touch each other or any moving parts. Use cable ties or clips to hold cables in place and avoid damage.
Testing The Battery And Mower
Check the battery with a multimeter to see if it holds a good charge. A healthy battery shows about 12.6 volts or more. Clean the battery terminals to remove any dirt or corrosion. This helps the mower start better.
Reconnect the battery cables carefully. Attach the positive cable(usually red) to the battery’s positive terminal. Then, attach the negative cable(usually black) to the negative terminal. Tighten the cable clamps so they are snug but not too tight.
Start the mower by turning the key or pressing the start button. The engine should turn over smoothly. If the mower does not start, check the cables again for a loose connection or corrosion. Repeat the testing if necessary.
Maintenance Tips For Battery Cables
Maintaining mower battery cables ensures a strong connection and longer battery life. Clean and inspect cables regularly to prevent corrosion. Replace damaged cables promptly to keep your mower running smoothly.
Regular Inspections
Inspect your battery cables often. Look for any cuts or damage. Loose connections can cause problems. Make sure all connections are tight. Frayed wires are dangerous. They can cause fires. Replace damaged wires quickly. Check for signs of wear and tear. Keep your cables in good shape.
Preventing Corrosion
Corrosion can harm battery cables. It looks like white powder. Clean it off with a brush. Use a mix of baking soda and water. Wear gloves to protect your hands. After cleaning, rinse with water. Dry the cables well. Apply petroleum jelly to prevent more corrosion. Keep cables clean to make them last longer.

Credit: www.youtube.com
Frequently Asked Questions
How Do I Safely Disconnect Mower Battery Cables?
Always turn off the mower and remove the key. Use insulated tools and disconnect the negative cable first to avoid sparks or short circuits.
What Tools Are Needed To Replace Mower Battery Cables?
You typically need a wrench, wire cutters, pliers, and replacement cables. Insulated gloves are recommended for safety during the process.
How Can I Identify The Correct Battery Cable Connections?
Look for marked terminals: the positive cable connects to the red terminal, and the negative cable connects to the black terminal.
How Often Should Mower Battery Cables Be Replaced?
Inspect cables annually and replace if you see cracks, corrosion, or fraying. Proper maintenance ensures reliable mower performance.
Conclusion
Replacing mower battery cables is a simple task anyone can do. Take your time and follow the steps carefully. Use the right tools and safety gear to avoid problems. Clean connections help your mower run smoothly and last longer. Check the cables regularly to spot any wear or damage.
A little care keeps your mower ready for the next job. Now you know how to replace mower battery cables safely and easily. Give it a try and keep your mower working well all season.


