Are you experiencing rough idling or having trouble starting your engine? It might be time to check your spark plug coil.
Testing it with a multimeter could save you time and money by pinpointing the issue. Imagine the satisfaction of diagnosing the problem yourself and the peace of mind that comes with knowing your engine is in top shape. You’ll discover how easy it is to test a spark plug coil using a multimeter, even if you’re not a seasoned mechanic.
Get ready to gain a new skill that could empower you to keep your vehicle running smoothly and efficiently. Let’s dive in and take control of your engine’s health!
Tools Needed
Testing a spark plug coil with a multimeter requires the right tools to get accurate results. Without proper equipment, you might misread the coil’s condition or even damage your vehicle’s ignition system. Knowing exactly what you need before starting saves time and prevents frustration.
Multimeter Types
Not all multimeters are created equal. A digital multimeter is usually the best choice for testing spark plug coils because it offers precise readings and is easy to use. Analog multimeters can work, but they may be harder to read and less accurate.
Look for a multimeter that can measure resistance (ohms) and continuity. These features are essential for checking the coil’s internal wiring and connections. If your multimeter has an auto-ranging function, it will make the process even smoother by automatically adjusting to the right measurement scale.
Additional Equipment
Besides a multimeter, a few other tools will make your job easier and safer. You’ll need insulated gloves to protect yourself from electrical shocks while handling the ignition system. A spark plug socket and ratchet help you remove the spark plug coil without damaging it.
Having a clean cloth or rag on hand is smart for wiping off dirt or oil from the coil before testing. Sometimes, dirt can interfere with your readings. Lastly, a notebook or smartphone can be handy to jot down your readings for comparison or future reference.
Safety Precautions
Before you start testing your spark plug coil with a multimeter, prioritizing safety is crucial. Working with your vehicle’s electrical system can be risky if you’re not careful. Taking the right precautions protects both you and your car from damage.
Disconnecting The Battery
Always disconnect the negative terminal of your car’s battery before handling the spark plug coil. This step stops any accidental electric shocks or short circuits. Remember, even a small spark can cause injury or harm your vehicle’s electronics.
Use insulated tools to loosen the terminal bolt. If the battery is difficult to reach, don’t force it—adjust your position instead. Have you ever underestimated how much power a car battery holds? It’s better to be safe than sorry.
Handling Spark Plug Coil
Handle the spark plug coil carefully to avoid damage and personal injury. Avoid touching the metal parts directly with your hands, especially if the engine was running recently. Residual heat can cause burns, and static electricity can affect the coil’s performance.
Wear rubber gloves for extra protection and use a clean cloth to grip the coil. Never pull on the wires—always disconnect them gently by the connectors. Have you noticed how a simple tug can damage delicate components? Treat your spark plug coil like a valuable piece of equipment.
Locating The Spark Plug Coil
Locating the spark plug coil is the first step in testing it with a multimeter. The coil is essential for creating the spark that ignites the fuel in the engine. Finding it can be simple or tricky depending on the vehicle. Knowing where to look saves time and helps avoid mistakes.
Engines may have different types of spark plug coils. Each type has a unique shape and position. Understanding the type helps in locating the coil quickly and safely.
Identifying Coil Types
- Coil-on-Plug:These coils sit directly on top of each spark plug. They are common in modern cars.
- Distributor Coil:Found in older vehicles, this coil connects to a distributor cap.
- Coil Pack:A group of coils packaged together, usually mounted on the engine or near it.
Different coil types require different access points. Recognizing your coil type guides you to the right location on the engine.
Access Points
- Open the car hood and secure it.
- Look near the top of the engine for coil-on-plug types.
- For coil packs, check the side or back of the engine block.
- Distributor coils often sit near the engine’s front or side.
- Remove any plastic covers if needed for better access.
Use a flashlight to see clearly inside the engine bay. Handle engine parts gently to avoid damage. Knowing the exact spot helps in testing the coil accurately.
Setting Up The Multimeter
Setting up your multimeter correctly is crucial before testing the spark plug coil. A proper setup ensures accurate readings and helps you avoid misdiagnosing a healthy or faulty coil. Let’s break down the essential steps to prepare your multimeter for this specific task.
Selecting Resistance Mode
First, turn on your multimeter and look for the resistance setting, often marked with the Greek letter omega (Ω). This mode measures electrical resistance, which is what you need to check the coil’s internal condition.
Choosing the right range is important. If your multimeter has manual range settings, pick one that can measure low resistance values, usually in the range of 0 to 20 kilo-ohms. This selection helps you capture precise resistance levels without overwhelming the meter.
Calibrating The Device
Before taking any measurements, calibrate your multimeter to avoid false readings. To do this, touch the two multimeter probes together; the display should read zero or very close to it.
If the reading isn’t zero, use the multimeter’s calibration dial or adjust the offset until the display reads zero. Calibration ensures that your multimeter’s baseline is accurate, making your spark plug coil test reliable.
Measuring Primary Coil Resistance
Measuring the primary coil resistance of a spark plug coil is a key step in diagnosing ignition problems. This test helps determine if the coil’s internal wiring is intact or if there’s a break causing poor spark performance. You’ll need a multimeter set to the ohms (Ω) setting to get accurate resistance readings.
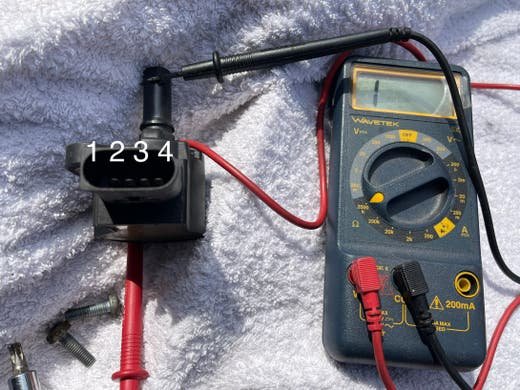
Probing The Terminals
Start by locating the primary coil terminals, usually marked as positive (+) and negative (−) or labeled on the coil housing. Use insulated probes to avoid accidental shorts.
Touch one probe to the positive terminal and the other to the negative terminal. Hold them steady to get a stable reading on your multimeter.
If your coil is still installed in the vehicle, disconnect the battery to prevent electrical hazards and remove any connectors blocking access to the terminals.
Interpreting Readings
Check the resistance value displayed on your multimeter and compare it to the manufacturer’s specification, typically found in your vehicle’s service manual.
A healthy primary coil usually has resistance between 0.4 and 2 ohms. If your reading is significantly higher or shows an open circuit (infinite resistance), the coil may be faulty.
Have you ever tried testing a coil only to find the reading fluctuates wildly? This can indicate an internal short or intermittent fault that’s harder to spot without consistent measurements.

Credit: www.youtube.com
Measuring Secondary Coil Resistance
Measuring the secondary coil resistance is a key step in testing a spark plug coil with a multimeter. It helps determine if the coil can produce enough voltage for the spark plugs. The secondary coil is the part that sends high voltage to the spark plugs. Checking its resistance ensures the coil’s internal wiring is intact and working properly. Low or high resistance values can indicate a faulty coil that needs replacement.
Locating Secondary Terminals
Start by identifying the secondary terminals on the spark plug coil. These terminals connect the coil to the spark plug wires. Usually, the secondary terminal is the large output terminal where the high voltage cable attaches. The other terminal is often the coil’s metal body or a specific marked point. Consult your vehicle’s manual or coil diagram to find exact locations. Make sure the coil is disconnected from the vehicle before testing.
Expected Resistance Values
Use a digital multimeter set to the ohms (Ω) scale to measure resistance. Place one probe on the secondary terminal and the other on the coil’s metal body or ground terminal. A typical secondary coil resistance ranges between 6,000 and 15,000 ohms. Values outside this range may signal a problem. Very high resistance means a broken wire or damaged coil. Very low resistance suggests a short circuit inside the coil. Always compare your readings to manufacturer specs for accuracy.
Testing For Coil Continuity
Testing for coil continuity ensures the spark plug coil is not broken inside. A continuous coil allows electricity to flow properly. A break in the coil stops the current and causes ignition problems. This test helps find faults before replacing parts unnecessarily. Using a multimeter for continuity is simple and quick. It shows if the coil wire is intact or damaged.
Using Multimeter Continuity Setting
Set the multimeter to the continuity mode. This mode usually shows a sound or a low resistance value. Remove the coil from the engine for accurate testing. Connect the multimeter probes to the coil’s terminals. The positive probe goes to the coil’s input terminal. The negative probe touches the output terminal.
Listen for a beep or check the screen. A beep or near-zero reading means the coil is continuous. No beep or infinite reading means the coil is broken inside. Check the multimeter manual for exact values if unsure. Test multiple coils if the engine has more than one.
Identifying Faulty Coils
A faulty coil shows no continuity on the multimeter. It can cause weak or no spark in the engine. Sometimes, coils have partial breaks causing irregular sparks. Multimeter readings may show high resistance in this case. Compare your readings with the coil’s specifications.
Look for these signs of a bad coil:
- No beep or infinite resistance reading
- Resistance value much higher than specified
- Intermittent continuity on testing
Replace coils that fail these tests. Testing coil continuity saves time and money. It avoids guessing and helps fix ignition problems quickly.
Common Issues And Solutions
Testing a spark plug coil with a multimeter often reveals common issues. These issues can affect engine performance and cause starting problems. Understanding these problems helps in quick diagnosis and repair. Below are typical issues and their solutions to guide you.
High Resistance Problems
High resistance in the spark plug coil can reduce spark quality. It causes weak or inconsistent sparks. The engine may misfire or run roughly. Use a multimeter to check coil resistance.
- Set the multimeter to the ohms (Ω) setting.
- Connect the probes to the coil terminals.
- Compare the reading with the manufacturer’s specifications.
If the resistance is higher than recommended, the coil is likely faulty. Replacing the coil usually solves the problem. Avoid using a coil with high resistance, as it stresses the ignition system.
Open Circuit Symptoms
An open circuit means no continuity inside the coil. This stops the spark from forming completely. The engine will not start or will stall unexpectedly.
- Set the multimeter to measure continuity or resistance.
- Test between the coil’s terminals.
- No reading or infinite resistance indicates an open circuit.
In this case, the coil needs replacement. Repair is rarely possible with an open circuit. Regular testing prevents sudden ignition failures on the road.
Tips For Accurate Testing
Testing a spark plug coil with a multimeter requires precision to get reliable results. Small errors can lead to misdiagnosis, wasting your time and money. Here are some practical tips to help you perform accurate testing every time.
Ensuring Clean Contacts
Dirty or corroded contacts can cause false readings. Before testing, wipe the spark plug coil terminals with a clean cloth or use fine sandpaper to remove any rust or debris.
Make sure the multimeter probes touch the metal surfaces firmly without slipping. A shaky connection can make your readings jump around, confusing you.
Have you ever struggled with inconsistent readings? Cleaning contacts often solves this problem and saves you from redoing the test multiple times.
Avoiding Common Mistakes
Don’t test the coil while it’s still connected to the engine. This can cause interference and give you inaccurate results.
Check your multimeter’s settings carefully. Using the wrong resistance range or mode can make your readings meaningless. Always set the multimeter to the ohms (Ω) scale for coil testing.
Remember to test at room temperature. Extreme cold or heat can affect the coil’s resistance, leading to errors.
Have you double-checked your multimeter’s battery? A weak battery often causes odd readings, and many overlook this simple fix.

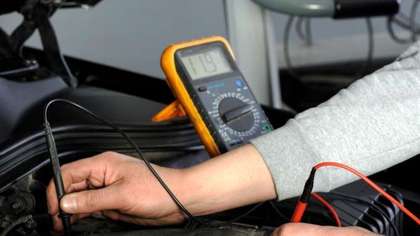
Credit: www.oreillyauto.com
Credit: car-repair.carsdirect.com
Frequently Asked Questions
How Do I Test A Spark Plug Coil With A Multimeter?
To test a spark plug coil, set your multimeter to ohms. Measure resistance between the coil terminals. Compare readings to your vehicle’s specifications to check coil health.
What Resistance Values Indicate A Good Spark Plug Coil?
A good coil typically shows primary resistance between 0. 4 and 2 ohms. Secondary resistance ranges from 6,000 to 15,000 ohms. Always verify with your vehicle’s manual for exact values.
Can A Multimeter Detect A Faulty Ignition Coil?
Yes, a multimeter can detect faulty coils by measuring resistance. Abnormal readings usually indicate internal damage or coil failure. This helps prevent engine misfires and performance issues.
Why Is Testing A Spark Plug Coil Important?
Testing ensures the coil delivers proper voltage for spark ignition. A faulty coil causes engine misfires, poor fuel economy, and starting problems. Regular tests maintain engine performance and reliability.
Conclusion
Testing a spark plug coil with a multimeter is simple and quick. It helps find problems early and saves money on repairs. Follow the steps carefully for accurate results. Regular checks keep your engine running smooth. Use the right tools and stay safe while testing.
Now, you can check spark plug coils with confidence. Keep your vehicle in good shape without extra costs. Easy steps lead to better car care every time.


