Is your mower not starting like it used to? It might be time to replace your mower battery.
Knowing how to do this yourself can save you time and money. In this guide, you’ll learn simple steps to swap out your old battery quickly and safely. By the end, you’ll feel confident keeping your mower powered up and ready to go whenever you need it.
Keep reading to discover how easy it is to bring your mower back to life.
Credit: www.youtube.com
Signs Your Mower Battery Needs Replacement
Knowing when your mower battery needs replacement can save you time and frustration. Batteries don’t always fail suddenly; they often give subtle signs before dying completely. Paying attention to these signals helps you avoid being stranded in the middle of your lawn work.
Common Battery Issues
Your mower battery might struggle with several common problems. One typical issue is slow or no engine start. If you find yourself turning the key multiple times with no response, the battery could be weakening.
Another sign is dim lights on your mower’s dashboard or headlights. This happens because the battery can’t supply enough power. Corroded or loose battery terminals also cause starting problems and poor electrical connections.
Have you noticed strange smells or leaking fluid around the battery? These are warning signs of internal damage and potential hazards. Ignoring these problems can lead to sudden battery failure.
How To Test The Battery
Testing your mower battery is simple and gives a clear answer about its condition. Start by using a multimeter to check the voltage. A fully charged 12V battery should read about 12.6 volts or more.
If your reading is below 12.4 volts, the battery might be weak. You can also perform a load test by turning the mower on and observing if the voltage drops significantly. A sharp voltage drop indicates the battery can’t hold a charge.
Another way to test is by using a battery tester device, which is available at most hardware stores. This tool measures battery health and provides an easy-to-understand result. Wouldn’t you want to know the exact status before spending money on a new battery?
Tools And Materials Needed
Before you start replacing your mower battery, gather all the necessary tools and materials. Having everything ready saves time and prevents frustration midway through the job. It also ensures you handle the battery safely and correctly.
Essential Tools
- Screwdrivers:Both flathead and Phillips screwdrivers are often needed to remove battery covers or terminals.
- Wrenches:A set of small wrenches or socket wrenches helps loosen and tighten battery terminal bolts.
- Gloves:Protective gloves keep your hands safe from battery acid and sharp edges.
- Safety Glasses:Shield your eyes from any accidental sparks or debris.
- Multimeter:Useful for checking the battery’s charge before removal to confirm if replacement is necessary.
- Cleaning Brush or Rag:To clean corrosion from the battery terminals and surrounding parts.
Have you ever struggled because you didn’t have the right wrench size? It’s a good idea to have a small toolkit handy. This way, you’re prepared for any unexpected fittings or screws.
Battery Types Compatible With Mowers
Not all batteries fit every mower. Most lawn mowers use 12-volt lead-acid batteries, but some models might require lithium-ion or gel batteries.
| Battery Type | Common Use in Mowers | Pros | Cons |
|---|---|---|---|
| Lead-Acid | Most traditional gas and electric mowers | Affordable, widely available | Heavier, requires maintenance |
| Lithium-Ion | Newer electric mowers | Lightweight, longer life, low maintenance | More expensive |
| Gel | Some high-end or specialty mowers | Spill-proof, durable in extreme temperatures | Costlier, less common |
Checking your mower’s manual before buying a replacement battery avoids compatibility issues. Have you ever bought a battery only to find it didn’t fit? It’s an avoidable hassle that wastes money and time.
Preparing The Mower For Battery Replacement
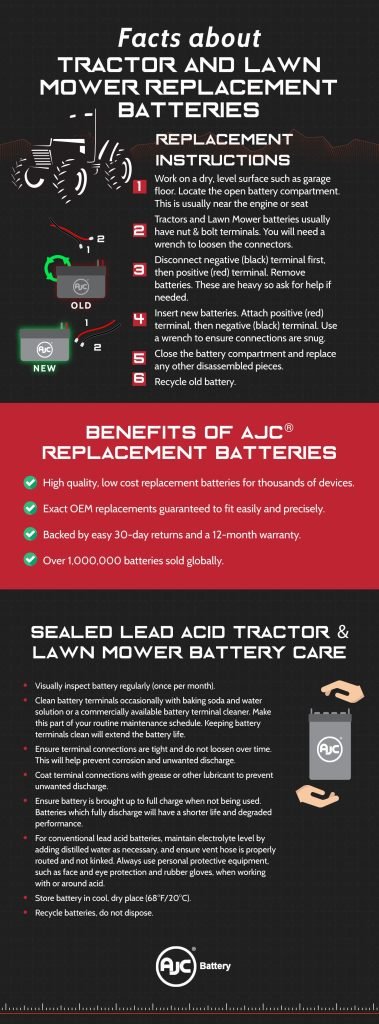
Replacing a mower battery involves several important steps. Ensuring your mower is ready for a new battery is crucial. Proper preparation makes the replacement process smooth and safe.
Safety Precautions
Safety first. Always wear protective gloves and goggles. Disconnect the spark plug to avoid accidental starts. This step is vital for your safety.
Ensure your mower is on a flat surface. This prevents unwanted movement during the replacement. Keep tools nearby for easy access.
Locating The Battery
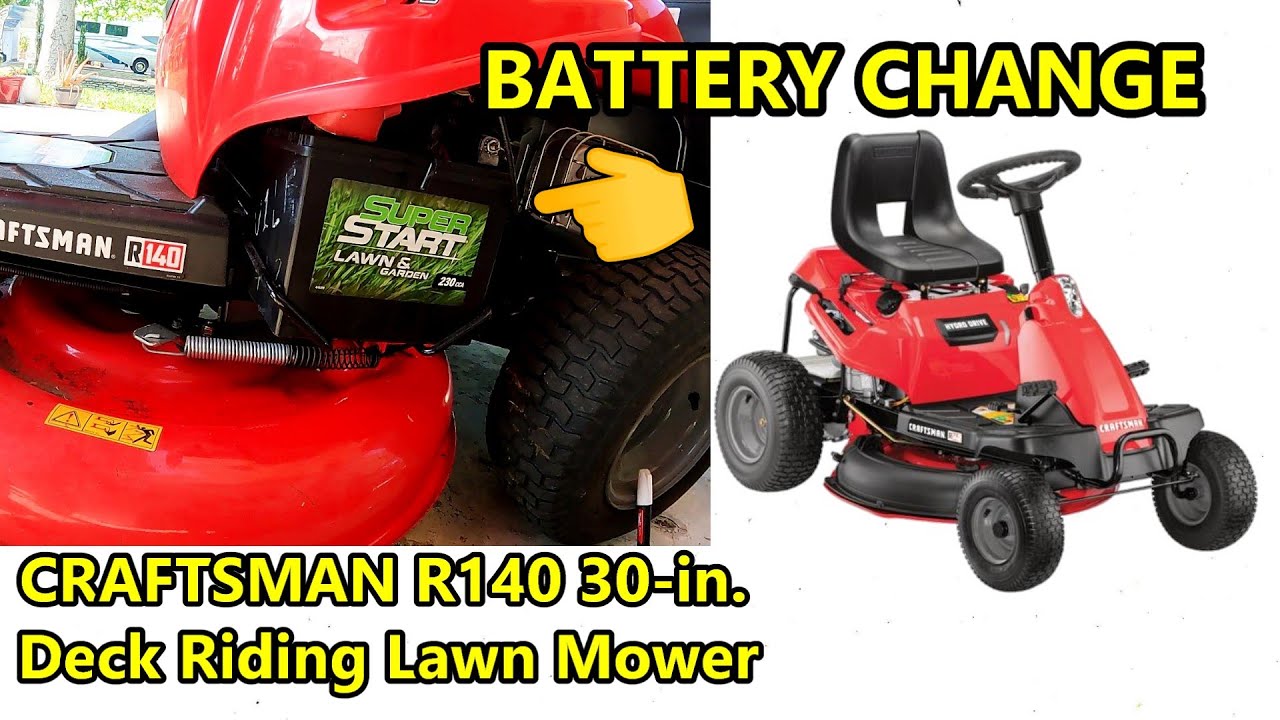
Finding the battery is the next step. Check the mower’s manual if unsure. Most batteries are under the seat or hood.
Once located, identify the terminals. Typically marked with a plus and minus sign. This helps in connecting the new battery correctly.

Credit: www.tycorunenergy.com
Removing The Old Battery
Removing the old battery from your mower is a crucial step before installing a new one. It might seem straightforward, but handling the battery correctly ensures your safety and protects your mower’s electrical system. Paying close attention while disconnecting cables and loosening hold-downs can save you from unexpected sparks or damage.
Disconnecting Battery Cables
Start by identifying the battery cables: one is positive (usually red), and the other is negative (usually black). Always disconnect the negative cable first to reduce the risk of short circuits. Use a wrench or socket to loosen the nut on the negative terminal and gently pull the cable off.
After the negative cable is safely removed, move on to the positive cable. Handle both cables carefully to avoid touching any metal parts with the wrench or your hands. Have you ever experienced a spark while working with batteries? This simple order of removal can prevent that from happening.
Removing Battery Hold-downs
Next, locate the battery hold-down mechanism securing your battery in place. This could be a clamp, strap, or bracket, depending on your mower’s model. Use the appropriate tool, often a socket wrench or screwdriver, to loosen and remove these hold-downs.
Keep the hold-down parts in a safe place if you plan to reuse them with the new battery. If the hold-downs are rusted or damaged, consider replacing them for a secure fit. Loose batteries can cause vibrations that damage your mower’s electrical connections over time—have you checked your hold-downs recently?
Installing The New Battery
Installing the new mower battery is a crucial step that ensures your lawnmower starts reliably and runs smoothly. Handling this process with care can save you from electrical issues and extend the life of your mower. Let’s look at how to position the battery correctly and connect the cables safely.
Positioning The Battery
First, check the battery compartment to make sure it’s clean and free of debris. Dirt or corrosion can affect the battery’s performance. Gently place the new battery into the compartment, aligning it exactly as the old one was positioned.
Pay attention to the orientation of the terminals—positive and negative—so the cables will reach without strain. If the battery feels loose, use any provided clamps or brackets to secure it firmly. Have you noticed how a loose battery can cause your mower to lose power unexpectedly? Securing it well prevents that problem.
Connecting Battery Cables Correctly
Connecting the cables in the right order is key to avoiding sparks or damage. Always attach the positive cable (usually red) first. This reduces the risk of short circuits.
After the positive cable is secured, connect the negative cable (usually black). Tighten the cable clamps firmly but don’t overdo it—too much force can damage the terminals. Once connected, give each cable a slight tug to ensure they’re secure.
Remember, mixing up the cables or connecting them loosely can leave you stranded with a mower that won’t start. Have you ever struggled with a mower that just wouldn’t turn on? This simple step often makes all the difference.
Testing The New Battery
Testing the new mower battery ensures your machine works properly. This step confirms the battery delivers enough power for smooth operation. It also helps spot any issues early. Proper testing saves time and frustration later.
Starting The Mower
Turn the key or press the start button to power the mower. Listen for a strong, steady sound from the engine. A weak or slow start may mean the battery is not fully charged. Check battery connections for tightness and cleanliness. Loose or dirty terminals can stop the mower from starting.
Checking Electrical Components
Look at lights, gauges, and any other electrical parts on your mower. They should turn on and work correctly. Dim lights or flickering displays can signal battery problems. Use a multimeter to check voltage if you have one. The reading should match the battery’s specification, usually 12 volts. Proper function of electrical parts confirms a healthy battery.
Battery Maintenance Tips
Maintaining your mower battery can save you time and money. Proper care keeps the battery working longer and ensures your mower starts without hassle. Here are some practical tips to help you keep your battery in top shape.
Regular Cleaning
Keep your battery terminals clean to avoid buildup that blocks power flow. Use a mixture of baking soda and water to gently scrub away any corrosion. Always wear gloves and disconnect the battery before cleaning to stay safe.
After cleaning, apply a thin layer of petroleum jelly or a specialized terminal protectant. This prevents future corrosion and keeps connections solid. Have you checked your battery terminals lately? Even a small amount of dirt can cause starting problems.
Proper Storage
If you don’t use your mower for a while, store the battery properly to extend its life. Remove the battery from the mower and keep it in a cool, dry place away from direct sunlight. Avoid freezing temperatures, which can damage the battery cells.
Charge the battery fully before storage and recharge it every month to prevent it from losing power. Leaving a battery discharged for too long can make it impossible to revive. Think about your mower’s off-season—are you ready to protect your battery during that time?

Credit: www.youtube.com
Frequently Asked Questions
How Do I Know When To Replace My Mower Battery?
You should replace your mower battery if it won’t hold a charge, is slow to start, or shows corrosion. Regularly check for wear and test voltage to ensure optimal performance and avoid unexpected mower failure.
What Tools Are Needed To Replace A Mower Battery?
You’ll typically need a wrench or socket set, gloves, and safety glasses. These tools help safely remove battery terminals and secure the new battery, ensuring a smooth replacement process without damaging mower components.
Can I Replace The Mower Battery Myself Safely?
Yes, you can replace it yourself by disconnecting the negative terminal first. Wear gloves and safety glasses, avoid sparks, and follow your mower’s manual for step-by-step guidance to ensure a safe and effective battery replacement.
How Do I Dispose Of An Old Mower Battery Properly?
Take your old mower battery to a recycling center or hazardous waste facility. Many retailers also accept used batteries. Proper disposal prevents environmental harm and complies with local regulations regarding battery waste.
Conclusion
Replacing your mower battery keeps your lawn mower running well. Follow the steps carefully for a safe and easy change. Use the right battery type and tools to avoid problems. Check connections to ensure the mower starts without issues. Regular battery care helps your mower last longer.
Now, you can handle battery replacement with confidence and keep your lawn neat all season. Simple, quick, and effective.