Facing a broken spark plug can feel like a daunting task. You might wonder if you’re up to the challenge or if it’s better left to the professionals.
But what if I told you that with a little guidance, you could tackle this automotive hiccup yourself? Imagine the satisfaction of solving this problem on your own, saving both time and money. In this blog post, you’ll discover simple, step-by-step instructions that will empower you to remove a broken spark plug with confidence.
By the end, you’ll not only have a clearer understanding of the process but also the reassurance that you can handle similar tasks in the future. Ready to dive in and take control of your car maintenance skills? Let’s get started!
Tools Needed
Removing a broken spark plug can be tricky without the right tools. Having the proper equipment not only makes the job easier but also helps avoid causing more damage to your engine. Let’s take a look at what you need to get started.
Essential Tools
- Spark Plug Socket:A deep socket designed to fit spark plugs securely. It usually has a rubber insert to grip the plug and prevent slipping.
- Ratchet Wrench:Provides the leverage needed to turn the socket. A 3/8-inch drive ratchet is common and versatile.
- Extension Bar:Helps reach spark plugs that are recessed deep within the engine block.
- Penetrating Oil:Essential for loosening rusted or stuck spark plugs before removal.
- Torque Wrench:Important for reinstalling the new spark plug to the correct tightness, preventing over-tightening or damage.
Optional Tools For Stubborn Plugs
- Spark Plug Extractor:A specialized tool designed to grip and remove broken spark plug fragments.
- Impact Driver:Useful if the plug is seized; it applies sudden rotational force to loosen it.
- Left-Handed Drill Bits:Can help drill into and extract broken plug pieces by turning counterclockwise.
- Magnetic Pickup Tool:Handy for retrieving any metal fragments dropped into the engine.
- Heat Gun or Propane Torch:Applying heat can expand the metal and make stuck plugs easier to remove, but use with caution.
Have you ever struggled with a spark plug that just wouldn’t budge? The right tools can make a huge difference between a frustrating experience and a smooth repair. Do you have these essentials ready for your next spark plug job?

Credit: www.odyclub.com
Safety Precautions
Handling a broken spark plug requires careful attention to safety. Taking proper precautions protects you and prevents damage to your vehicle. Follow these safety steps before starting the removal process.
Disconnecting The Battery
Always disconnect the car battery before working on spark plugs. This stops any electrical current from flowing. It reduces the risk of electric shock or short circuits. Use a wrench to remove the negative battery cable first. Keep the cable away from the battery terminal during your work.
Wearing Protective Gear
Wear safety glasses to protect your eyes from debris. Use gloves to shield your hands from sharp edges and hot parts. Long sleeves help prevent scratches and burns. Choose gloves with good grip to hold tools firmly. Proper gear keeps injuries and accidents at bay.
Preparing The Area
Preparing the area is the first key step to removing a broken spark plug safely. A clean and clear workspace helps avoid damage and makes the process easier. Take time to organize tools and clear debris near the spark plug.
Cleaning Around The Spark Plug
Remove dirt and dust from the spark plug area before removal. Use a brush or compressed air to clean loose debris. This prevents dirt from falling into the engine cylinder.
Wipe the area with a clean cloth to remove grease. Avoid using water as it may cause rust or electrical issues. A clean surface helps you see the spark plug clearly and work more efficiently.
Accessing The Spark Plug
Locate the spark plug by consulting the vehicle manual or engine diagram. Identify any parts blocking easy access, such as engine covers or wires. Remove these parts carefully using the right tools.
Keep all screws and bolts organized to avoid losing them. Ensure the engine is cool to prevent burns. Good access to the spark plug allows you to work without strain or mistakes.
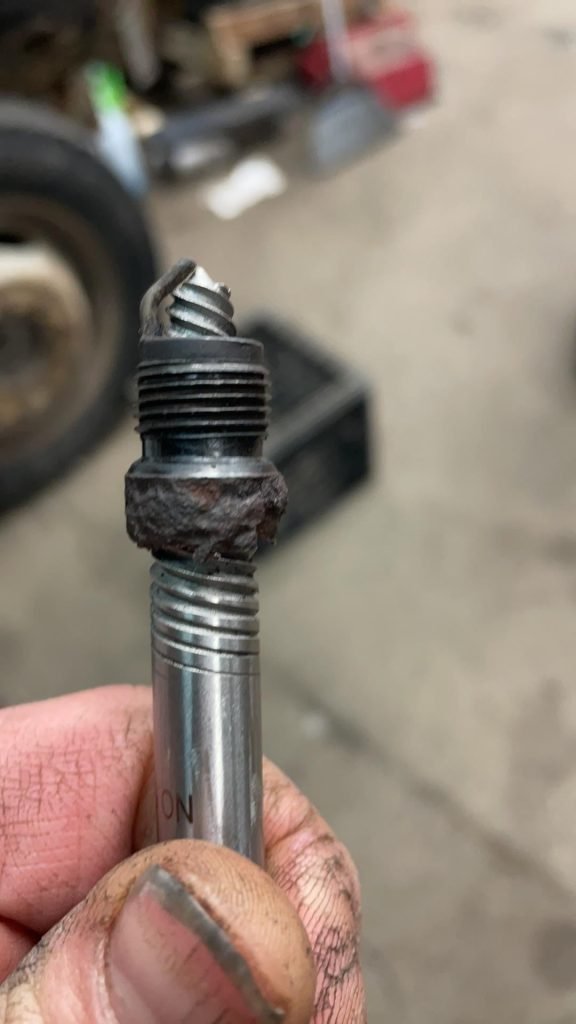
Credit: www.bmwlt.com
Removing The Broken Spark Plug
Removing a broken spark plug can be tricky but is necessary to keep your engine running smoothly. The process requires patience and the right tools to avoid further damage. Start by preparing the area and gathering materials. Then, carefully loosen and extract the broken pieces.
Using Penetrating Oil
Spray penetrating oil around the broken spark plug area. Let it sit for 10 to 15 minutes. The oil helps loosen rust and debris. This makes it easier to remove the stuck parts. Apply more oil if needed during the process. Be gentle when applying force to avoid damage.
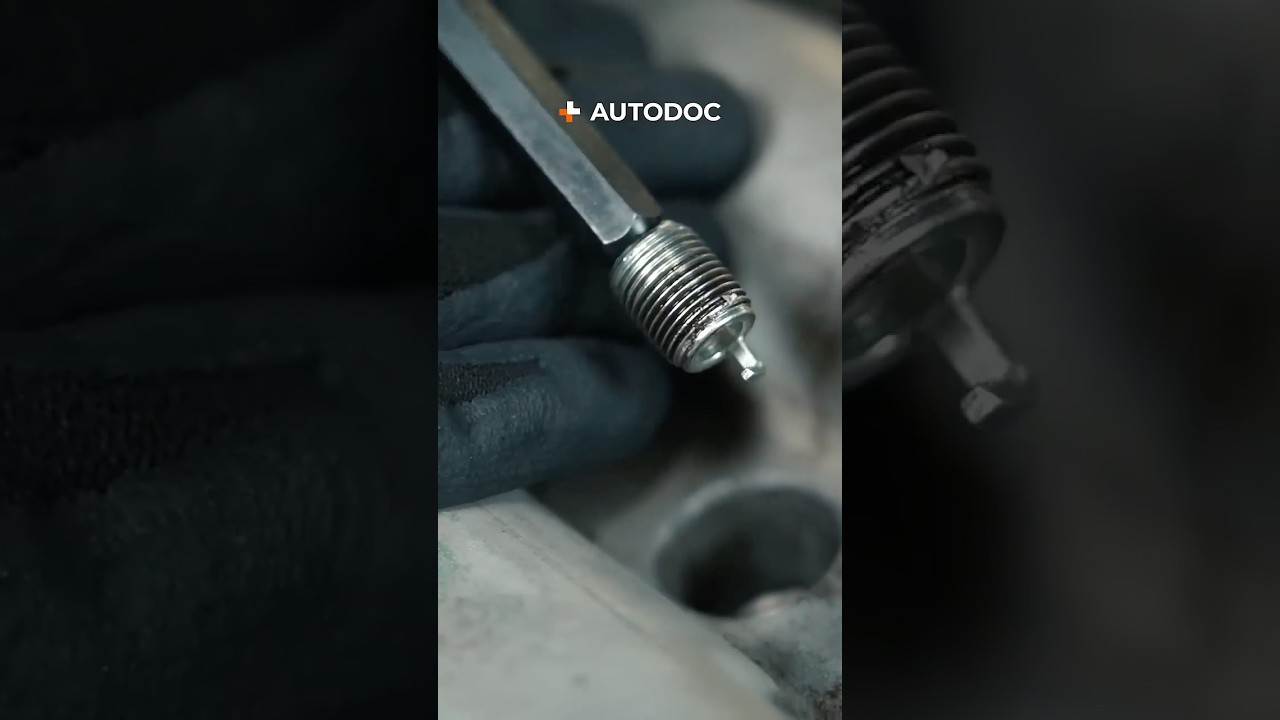
Extracting With A Spark Plug Extractor
A spark plug extractor is a special tool designed for this task. Insert the extractor into the spark plug hole. Turn it counterclockwise slowly to grip the broken piece. Keep steady pressure and avoid sudden moves. The tool should catch and pull out the broken plug. Repeat if the plug does not come out at first.
Alternative Methods
- Use needle-nose pliers to grab exposed parts carefully.
- Try a rubber band for extra grip in the hole.
- Tap gently around the spark plug to loosen it.
- Heat the area slightly to expand metal and ease removal.
Each alternative method needs caution to prevent damage. Take your time and check progress frequently.
Inspecting The Cylinder Head
After successfully removing a broken spark plug, your next move should be to inspect the cylinder head carefully. This step is crucial because any damage or debris left behind can cause serious engine problems. Taking the time to check and clean the area ensures your engine runs smoothly and prevents further headaches down the road.
Checking For Damage
Start by closely examining the cylinder head around the spark plug hole. Look for cracks, corrosion, or any signs of wear that might affect the seal or performance. Even a small crack can lead to compression loss or oil leaks, so don’t rush this part.
Use a bright flashlight and a magnifying glass if needed to get a clear view. If you spot damage, ask yourself whether it’s something you can fix or if professional help is necessary. Remember, ignoring these issues can lead to costly repairs later.
Cleaning Threads
Once you confirm the cylinder head is in good shape, focus on cleaning the threads inside the spark plug hole. Dirt, carbon deposits, or metal shavings left from the broken plug can prevent the new spark plug from seating properly.
Use a thread chaser or a tap designed for spark plug holes to gently clean the threads. Avoid using excessive force, as this can damage the threads further. After cleaning, blow out the hole with compressed air to remove any loosened debris.
Have you ever skipped this step and faced spark plug seating issues? Taking the time to clean the threads can save you from misfires and uneven engine performance.
Installing A New Spark Plug
Installing a new spark plug is the final step after removing a broken one. It ensures your engine runs smoothly and efficiently. Proper installation prevents damage and maintains engine performance. This section covers how to select the right spark plug and install it with the correct torque.
Choosing The Right Spark Plug
Select a spark plug that matches your vehicle’s specifications. Check the owner’s manual for the recommended type and size. Consider the heat range suitable for your engine. Use spark plugs from trusted brands to ensure quality. Avoid cheap or generic plugs that may wear out quickly.
Proper Installation Techniques
Start by cleaning the spark plug hole to remove debris. Hand-thread the new spark plug carefully to avoid cross-threading. Use a spark plug socket and ratchet to tighten it. Ensure the spark plug sits flush and straight in the cylinder head. Double-check the gap on the spark plug before installation.
Torque Specifications
Follow the torque values given in the vehicle manual. Over-tightening can damage the threads or the spark plug. Under-tightening may cause poor engine performance or spark plug loosening. Use a torque wrench for accurate tightening. Typical torque ranges from 13 to 25 lb-ft, but always verify for your model.
Testing The Repair
After successfully removing and replacing a broken spark plug, testing the repair is crucial to ensure your engine runs smoothly. This step helps you catch any issues early and confirms that your hard work paid off. Let’s look at how to check your repair effectively.
Starting The Engine
Turn your key and start the engine gently. Listen closely for any unusual sounds like knocking or sputtering, which could indicate a problem.
If the engine struggles to start or stalls quickly, don’t ignore it. This might mean the spark plug isn’t seated correctly or there’s another underlying issue.
Have you noticed how a well-installed spark plug makes the engine roar to life without hesitation? That’s the sign you want to hear.
Checking For Leaks And Performance
Once the engine is running, check around the spark plug area for any signs of fuel or oil leaks. Even a small leak can affect your engine’s performance and cause damage over time.
Pay attention to how your vehicle accelerates and idles. Is the engine smooth, or does it hesitate or misfire? These symptoms can tell you if the spark plug repair truly fixed the problem.
Try driving the car for a short distance. Notice if the fuel efficiency feels off or if the engine sounds different. These real-world tests reveal if your repair holds up under normal conditions.
Credit: www.youtube.com
Frequently Asked Questions
How Do I Safely Remove A Broken Spark Plug?
Use penetrating oil and let it soak for 15 minutes. Then, use a spark plug extractor carefully to avoid damaging the threads. Turn counterclockwise slowly until the broken piece loosens and can be removed.
What Tools Are Needed To Remove Broken Spark Plugs?
You need a socket wrench, spark plug extractor, penetrating oil, and a torque wrench for installation. Safety gloves and eye protection are also recommended to prevent injury during removal.
Can I Remove A Broken Spark Plug Without Damaging The Engine?
Yes, by using the correct extractor tool and applying gentle, steady force. Avoid using excessive pressure to prevent thread damage or engine harm.
How Long Does It Take To Remove A Broken Spark Plug?
Typically, it takes about 20-30 minutes depending on the plug’s condition and your experience. Patience is key to avoid damaging the cylinder head.
Conclusion
Removing a broken spark plug takes patience and the right tools. Start slow and avoid forcing parts. Clean the area well before you begin. Use proper techniques to prevent engine damage. Taking your time helps avoid extra problems. With care, you can fix this issue yourself.
Keep safety in mind throughout the process. Now, your engine can run smoothly again. Simple steps lead to better car care.


