Crimping a spark plug wire might seem like a task best left to the pros, but with a little guidance, you can master it yourself. Imagine the satisfaction of knowing you’ve tackled an essential part of your vehicle’s maintenance, boosting its performance and reliability.
You’re not just saving money; you’re gaining control over your vehicle’s health. This guide will walk you through the steps, ensuring you feel confident and empowered. Are you ready to enhance your DIY skills and keep your engine running smoothly?
Let’s get started.

Credit: www.amazon.com
Tools Needed
Crimping a spark plug wire requires a few essential tools to ensure a strong and reliable connection. Using the right tools makes the job easier and prevents damage to the wire or terminal. Prepare these tools before starting to achieve professional results.
Crimping Tool Types
Choose a crimping tool designed for spark plug wires. There are two main types:
- Manual Crimpers:Handheld tools that apply pressure to secure the terminal.
- Ratchet Crimpers:Provide consistent pressure and lock in place for precise crimps.
Ratchet crimpers offer better control but manual crimpers are often sufficient for small jobs.
Selecting The Right Wire
Pick a spark plug wire that matches your vehicle’s specifications. Consider these factors:
- Length:Enough to reach from the spark plug to the distributor or coil.
- Material:Silicone or EPDM insulation for heat and chemical resistance.
- Gauge:Thicker wire reduces resistance and boosts performance.
Using the proper wire ensures durability and optimal engine function.
Choosing The Correct Terminal
The terminal must fit both the wire and spark plug securely. Look for these traits:
- Compatibility:Matches the wire gauge and spark plug design.
- Material:Often made of copper or brass for good conductivity.
- Fit:Snug enough to prevent loosening from engine vibrations.
Select terminals that provide a tight connection without damaging the wire.
Preparing The Wire
Preparing the wire is an essential step before crimping a spark plug wire. This phase ensures the wire fits perfectly and functions well. Proper preparation prevents electrical issues and extends wire life. Follow the steps carefully to get a clean and safe connection.
Measuring And Cutting
Measure the length of the wire needed for your vehicle. Use a tape measure or ruler for accuracy. Cut the wire straight using sharp wire cutters. Avoid jagged or crushed edges to maintain a good connection. A clean cut helps the crimp hold firmly.
Stripping The Insulation
Strip the insulation from the wire end carefully. Use a wire stripper tool to avoid damaging the wire strands. Remove only enough insulation to expose the metal core. Too much exposed wire can cause shorts. Keep the exposed part neat and even.
Checking Wire Condition
Examine the wire for any signs of wear or damage. Look for cracks, corrosion, or frayed strands. Replace the wire if you find any defects. A healthy wire ensures good conductivity and safety. Clean the wire end if dirt or grease is present.
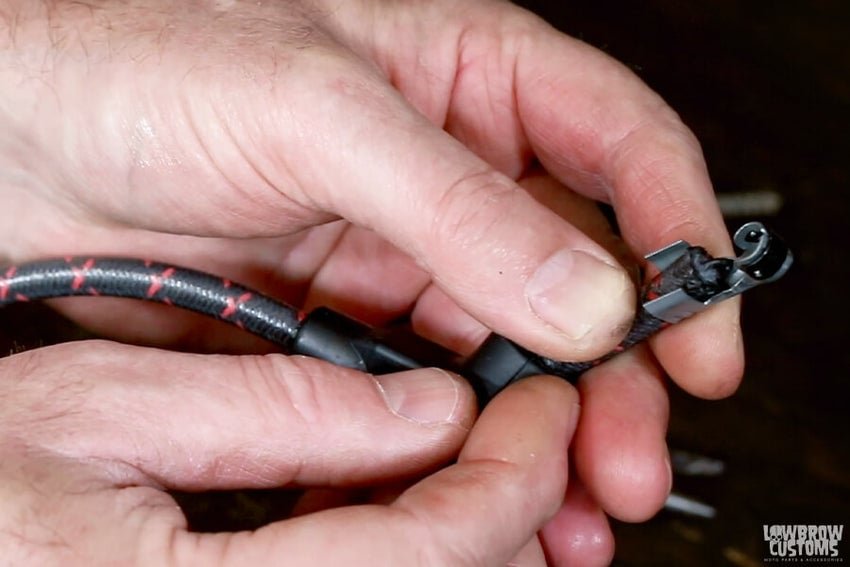
Attaching The Terminal
Attaching the terminal to a spark plug wire is a crucial step that ensures a solid electrical connection and reliable engine performance. This process requires careful attention to detail to avoid misfires or weak sparks. Let’s break down how to handle this task with confidence and precision.
Inserting The Wire
Start by stripping the wire’s insulation carefully, exposing just enough copper to fit inside the terminal. Too much exposed wire can cause shorts, while too little won’t make a proper connection.
Gently twist the exposed copper strands to keep them tight. This prevents fraying and makes insertion smoother. Have you noticed how a loose wire can cause your engine to hesitate? That’s why this part matters.
Positioning The Terminal
Slide the terminal onto the wire so the copper strands sit fully inside the metal barrel. The terminal should cover all exposed wire without squeezing the insulation too much.
Hold the terminal steady, checking that it’s straight and not tilted. Misalignment here can lead to poor crimping and unreliable contact. Think about the last time you had a loose spark plug wire—did you check if the terminal was properly seated?
Ensuring Proper Fit
Use a quality crimping tool designed for spark plug terminals. Position the tool over the terminal’s barrel and apply firm, even pressure until the metal compresses tightly around the wire.
After crimping, tug gently on the wire to test the grip. A secure fit won’t let the wire slip out easily. If you feel any movement, re-crimp or reposition the wire and terminal. Your engine depends on this secure connection—don’t rush it.

Credit: wirefyshop.com
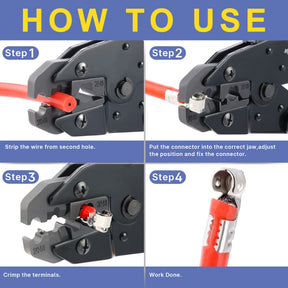
Crimping Process
The crimping process ensures a strong, reliable connection between the spark plug wire and its terminal. A proper crimp prevents electrical loss and keeps the wire secure during engine operation. This process involves setting the right tool, applying enough pressure, and checking the crimp quality.
Setting The Tool
Select a crimping tool that fits the terminal size. Adjust the tool’s die to match the wire gauge. This ensures a tight grip without damaging the wire. Position the terminal in the tool’s jaws carefully. Align the wire end inside the terminal before crimping.
Applying Pressure
Squeeze the handles of the crimping tool firmly and steadily. Apply enough force to compress the terminal around the wire strands. Avoid using too little pressure, which can cause a loose connection. Too much pressure may crush or cut the wire. Hold the tool closed for a few seconds to ensure a solid crimp.
Verifying The Crimp
Inspect the crimp visually for uniform compression. The terminal should wrap tightly around the wire without gaps. Give a gentle tug on the wire to check security. The wire must not pull out easily. A good crimp looks clean and holds the wire firmly in place.
Testing The Connection
After crimping your spark plug wire, ensuring a solid and reliable connection is crucial. Testing the connection helps you avoid misfires and engine performance issues down the road. Let’s look at some simple yet effective ways to verify your work.
Tug Test
The tug test is a quick way to check if the wire is securely crimped to the terminal. Gently pull on the wire near the crimped area. If it feels loose or slips out, the crimp isn’t tight enough and needs redoing.
Don’t underestimate this test. A wire that passes the tug test will hold firm even under engine vibrations, giving you peace of mind.
Continuity Check
Using a multimeter, you can test the electrical continuity through the crimped wire. Set the multimeter to the resistance or continuity mode, then place the probes on each end of the wire.
A low resistance reading or a beep indicates a good connection. If the reading is high or there’s no beep, the wire might have a break or poor contact inside the crimp.
Inspecting For Damage
Visual inspection is often overlooked but essential. Look closely at the crimped area for any signs of damage like crushed insulation, bent terminals, or exposed wire strands.
Any damage can cause shorts or signal loss. If you spot issues, it’s better to cut and re-crimp the wire than risk engine trouble later.
Credit: haisstronica.com
Tips For Durable Crimps
Creating durable crimps on spark plug wires ensures a secure electrical connection. Strong crimps prevent wire loosening and engine misfires. Following simple tips can improve the quality and lifespan of your crimps.
Avoiding Common Mistakes
- Do not over-crimp or under-crimp the wire terminals.
- Make sure the wire is fully inserted into the terminal before crimping.
- Use the correct size terminal for the wire gauge.
- Check crimps for proper tightness and uniformity.
- Avoid twisting wires before crimping to ensure good contact.
Maintaining Tools
- Keep crimping tools clean and free from rust or debris.
- Regularly check the tool’s alignment and jaws for damage.
- Lubricate moving parts as recommended by the manufacturer.
- Store tools in a dry place to prevent corrosion.
- Replace worn-out tools to maintain crimp quality.
Choosing Quality Materials
- Select terminals made from corrosion-resistant metals like copper or brass.
- Use wires with proper insulation and correct gauge size.
- Avoid cheap or low-quality terminals as they may fail quickly.
- Purchase materials from reputable suppliers for consistency.
- Check for certifications or standards that ensure material reliability.
Frequently Asked Questions
What Tools Do I Need To Crimp A Spark Plug Wire?
You need wire strippers, a crimping tool, spark plug wire terminals, and protective gloves. These tools ensure a secure and proper crimp connection.
How Do I Prepare The Spark Plug Wire For Crimping?
Strip about 1/4 inch of insulation from the wire end. Avoid cutting the wire strands to ensure a solid crimp.
What Is The Correct Way To Use A Crimping Tool?
Place the terminal in the tool’s jaw, insert the wire, and squeeze firmly. This creates a tight, durable connection.
How Can I Tell If The Crimp Is Done Properly?
A good crimp is tight, with no loose wires or gaps. The terminal should not move when pulled gently.
Conclusion
Crimping a spark plug wire is simple with the right steps. Use the correct tools for a secure connection. Check the wire carefully to avoid damage. Tight crimps help your engine run smoothly. Practice makes the process easier and faster.
Keep safety in mind while working on your car. A well-crimped wire improves engine performance and reliability. Try it yourself to save time and money. Remember, small repairs can make a big difference.


