Is your mower grass catcher clogged or full of stubborn grass clippings? Keeping it clean is key to making your lawn look great and your mower work smoothly.
If you’ve ever struggled with a messy catcher that slows you down, you’re not alone. But don’t worry—cleaning your mower grass catcher doesn’t have to be a hassle. In this guide, you’ll discover simple, effective steps to get your catcher spotless and ready for action.
Stick with me, and you’ll save time, avoid frustration, and keep your mower running like new. Ready to make your lawn care easier? Let’s dive in!

Credit: www.amazon.ca
Tools Needed
Cleaning a mower grass catcher is easier with the right tools. These tools help remove dirt, grass clippings, and debris quickly. Using proper equipment prevents damage and keeps your catcher in good shape.
Gloves
Wear gloves to protect your hands from sharp edges and dirt. They keep your hands clean and safe during cleaning.
Garden Hose
A garden hose helps wash off grass clippings and dirt. Use it with a spray nozzle for better water pressure.
Soft Brush
A soft brush removes stuck grass and debris without damaging the catcher material. Choose one with gentle bristles.
Mild Soap
Mild soap or detergent helps break down dirt and grime. Avoid harsh chemicals that can weaken the catcher fabric.
Bucket
Fill a bucket with soapy water for soaking and scrubbing the catcher. It makes cleaning more effective.

Credit: www.wholetoolbox.com
Safety Precautions
Cleaning your mower grass catcher safely prevents injuries and damage. Taking precautions protects you from sharp blades and moving parts. Safety also ensures the mower stays in good condition.
Turn Off And Unplug The Mower
Always switch off the mower before cleaning the grass catcher. Unplug the mower or remove the spark plug wire. This stops accidental starting during cleaning.
Wear Protective Gear
Use gloves to protect your hands from sharp edges and dirt. Safety glasses help keep debris out of your eyes. Wear sturdy shoes to protect your feet.
Wait For The Mower To Cool
The mower engine and parts get hot during use. Wait at least 30 minutes before cleaning. This prevents burns and heat-related injuries.
Handle The Grass Catcher Carefully
Remove the grass catcher gently to avoid damage. Check for sharp or broken parts before cleaning. Use a brush or cloth, not your hands directly.
Keep Children And Pets Away
Clean the mower grass catcher in a safe place. Keep children and pets far from the mower. This prevents accidents and distractions during cleaning.
Removing The Grass Catcher
Removing the grass catcher from your mower is the first essential step before you can clean it effectively. Handling this part with care ensures you don’t damage any components, and it makes the cleaning process smoother. Knowing how to properly detach the catcher also saves you time and frustration.
Identify The Attachment Points
Before you pull off the grass catcher, take a close look at how it’s connected to your mower. Most catchers attach via hooks, clips, or a simple slot-in mechanism. Recognizing these points helps you avoid forcing the catcher off and potentially breaking it.
Release The Catcher Gently
Once you spot the attachment method, gently undo it. If there are clips, press or lift them carefully. For hooks or slots, slide or lift the catcher with steady pressure. Avoid yanking or twisting harshly, which can cause cracks or warping.
Check For Stuck Grass Or Debris
Sometimes, wet grass or debris holds the catcher tightly to the mower. If you feel resistance, inspect around the edges for any clumps. You might need to clear these away with a stick or gloved hand before the catcher comes off smoothly.
Keep The Mower Stable
While removing the catcher, ensure your mower is on a flat surface and turned off. This stabilizes the mower and prevents accidents. Have a firm grip on both the mower and catcher to maintain control during removal.

Credit: www.amazon.ca
Emptying The Catcher
Keeping your mower in top condition involves regular maintenance. One essential part is emptying the grass catcher. This task helps prevent clogs and ensures smooth operation. Regular emptying also maintains the mower’s efficiency. It’s a simple task but crucial for lawn care.
Preparation For Emptying
Before starting, switch off your mower. Allow it to cool down. Safety first. Wear gloves to protect your hands from dirt and sharp objects.
Locate The Catcher
Identify where the catcher is attached. It’s usually at the back. Check how it’s secured. Different mowers have varying mechanisms.
Detach The Catcher
Gently release the catcher from the mower. Use both hands for balance. Be careful not to spill grass everywhere. Keep the area tidy.
Dispose Of The Grass
Find an appropriate disposal location. An outdoor compost heap works well. Avoid dumping in restricted areas. Respect environmental guidelines.
Check For Blockages
Inspect the catcher for any blockages. Ensure no grass clumps remain inside. A clean catcher functions better. Use a brush if needed.
Reattach The Catcher
Secure the catcher back onto the mower. Ensure it’s tightly fastened. Proper attachment prevents accidents. Check the latch is secure.
Cleaning Methods
Keeping your mower grass catcher clean is key to maintaining its performance and extending its lifespan. Different cleaning methods help you tackle dirt, grass clippings, and debris effectively. Let’s explore some practical ways to clean your grass catcher so it stays fresh and ready for your next mowing job.
Using Water And Soap
Start with a simple mix of warm water and mild soap. Fill a bucket with this soapy water and soak the grass catcher for 10 to 15 minutes to loosen stuck-on grass and dirt.
Use a garden hose to rinse off the soap and debris thoroughly. If your catcher has stubborn spots, gently scrub them after soaking to avoid damage.
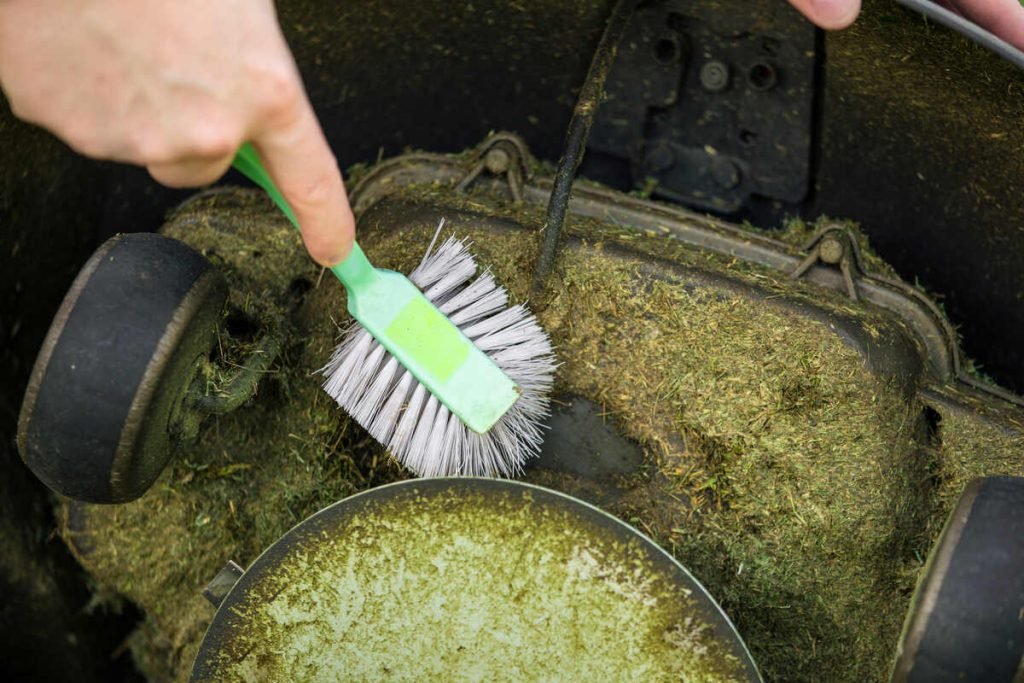
Using A Brush
A stiff-bristled brush helps remove dried grass and mud that water alone can’t wash away. Focus on corners and seams where debris often hides.
Try using an old toothbrush for tight spaces; it’s surprising how much grime hides in small crevices. Be careful not to use anything too hard that could tear the fabric or plastic.
Drying Techniques
After cleaning, let your grass catcher air dry completely to prevent mold and unpleasant odors. Hang it upside down in a well-ventilated area, like a porch or garage.
If you’re in a hurry, use a clean towel to pat it dry before hanging. Avoid using direct heat sources like hair dryers, which can warp plastic parts or weaken fabric.
Dealing With Stubborn Grass And Debris
Stubborn grass and debris often clog mower grass catchers. This makes cleaning tricky and time-consuming. Removing tough buildup keeps your catcher working well and extends its life.
Some debris sticks tightly to the catcher’s surface. Dry grass clumps or wet, matted clippings cause blockages. Dirt and small twigs add to the mess. Clearing these requires patience and proper tools.
Use A Soft Brush For Scrubbing
A soft brush loosens stuck grass without damaging the catcher. Use gentle strokes to break apart clumps. This prevents scratches and keeps the material intact. Brushes with firm bristles work best.
Rinse With Water And Mild Soap
Spray the catcher with water to soften dried debris. Add a little mild soap to remove oils and dirt. Let the solution sit for a few minutes. Then rinse thoroughly to wash away loosened grass.
Remove Debris With A Plastic Scraper
A plastic scraper helps remove hard clumps stuck inside corners. Avoid metal tools to prevent damage. Gently scrape off buildup without forcing it. This clears tight spots effectively.
Dry Completely Before Reattaching
Let the catcher air dry fully after cleaning. Moisture can cause mold or rust in some parts. Use a clean towel to speed drying. Store the catcher in a dry place until next use.
Reassembling The Catcher
Reassembling the mower grass catcher is a simple process. It restores your mower’s ability to collect grass clippings efficiently. Taking your time during this step prevents future problems. Follow clear instructions to ensure everything fits perfectly. A properly reassembled catcher improves lawn maintenance and mower performance.
Check All Parts For Cleanliness And Damage
Before putting the catcher back together, inspect each part. Make sure all debris and dirt are removed. Look for cracks, holes, or broken attachments. Clean parts fit better and last longer. Replace any damaged pieces to avoid leaks or poor collection.
Align The Catcher Frame And Bag
Place the catcher frame on a flat surface. Attach the grass bag carefully to the frame edges. Ensure the fabric sits evenly without folds or twists. Proper alignment helps the bag collect grass without falling off. Tighten any straps or clips to secure the bag firmly.
Attach The Catcher To The Mower
Position the catcher behind the mower’s discharge chute. Slide or hook it into place according to your mower model. Check that it locks securely and does not wobble. A stable catcher prevents grass clippings from spilling onto the lawn. Test the fit by gently pulling on the catcher.
Perform A Final Inspection
Look over the entire assembly for loose parts or gaps. Confirm the bag opens and closes easily if it has a flap. Make sure no sharp edges can tear the bag. A thorough final check saves time and effort during mowing. Your catcher is now ready for use.
Maintenance Tips
Maintaining your mower grass catcher extends its life and keeps it working well. Regular care stops clogs and bad smells. It also helps the catcher hold more grass with each use. A simple routine keeps your mower running smoothly and your yard neat.
Regular Cleaning Schedule
Clean the grass catcher after every mow. Empty all grass clippings to avoid buildup. Use a brush or cloth to remove stuck grass and dirt. Rinse with water and let it dry fully before storing. A dry catcher avoids mold and rust. Check for tears or holes during cleaning. Repair small damages early to stop them from growing.
Storage Advice
Store the grass catcher in a dry, shaded area. Avoid leaving it outside where rain or sun can damage it. Hang it or place it off the ground to keep away pests. Keep it away from sharp tools that may cause tears. Cover it with a cloth or plastic if stored in a dusty place. Proper storage protects the catcher and saves money on replacements.
Frequently Asked Questions
How Often Should I Clean My Mower Grass Catcher?
Clean your mower grass catcher after every use. This prevents grass buildup and keeps your mower efficient. Regular cleaning extends the catcher’s lifespan and improves lawn health by avoiding clogs and odors.
What Tools Do I Need To Clean A Grass Catcher?
You’ll need a garden hose, soft brush, mild detergent, and gloves. These tools help remove grass clippings and dirt safely without damaging the catcher’s material.
Can I Use A Pressure Washer On A Grass Catcher?
It’s best to avoid pressure washers as they may damage the catcher. Use a garden hose and gentle scrubbing instead for effective and safe cleaning.
How Do I Remove Stubborn Grass Stains From The Catcher?
Apply a mild detergent with a soft brush to stained areas. Let it sit for a few minutes, then rinse thoroughly with water to remove residues.
Conclusion
Cleaning your mower grass catcher keeps it working well. Regular cleaning stops clogs and bad smells. Use simple tools and water for quick cleanup. Dry it fully before storing to avoid rust. Clean catchers help your mower run longer and better.
A little effort saves time and money later. Keep your mower ready for the next cut. Simple steps make a big difference every time.