Your mower won’t start, and you’re wondering why. One common culprit might be dirty battery terminals.
When your mower’s battery terminals get corroded or covered in grime, it can block the flow of power and leave you stuck. But don’t worry—cleaning them is easier than you think. You’ll learn simple, step-by-step tips to clean your mower battery terminals quickly and safely.
Keep reading, and you’ll be back to mowing smoothly in no time.

Credit: www.lawnsite.com
Safety Precautions
Cleaning your mower battery terminals might seem straightforward, but ignoring safety can lead to serious injuries or damage. Taking the right precautions ensures you protect yourself and your equipment. Let’s look at the key safety steps you should always follow before starting the cleaning process.
Wear Protective Gear
Always wear gloves and safety goggles before touching the battery terminals. Battery acid is corrosive and can cause burns or eye injuries if it splashes. Even a small amount of acid can irritate your skin, so use thick gloves that resist chemical exposure.
Consider wearing old clothes or an apron to protect your skin and clothing. Have a clean water source nearby in case you need to rinse off any acid quickly. Do you keep your protective gear ready before starting maintenance tasks?
Disconnect The Battery
Before cleaning, disconnect the battery cables to avoid electrical shocks or short circuits. Start by removing the negative (-) terminal first, then the positive (+) terminal. This order helps prevent sparks that could ignite battery gases.
Use a wrench or pliers to loosen the nuts, but don’t force them if they’re stuck. Applying a little penetrating oil can help loosen corroded connections safely. Have you checked that your tools are insulated to reduce the risk of accidental shorts?
Work In A Well-ventilated Area
Battery acid releases harmful fumes that can irritate your lungs or eyes. Choose a workspace with plenty of fresh air, such as outdoors or a garage with open doors and windows. Avoid enclosed spaces without ventilation when cleaning the terminals.
If you notice any dizziness or difficulty breathing, stop immediately and move to fresh air. Proper ventilation protects your health and helps the cleaning process go smoothly. How often do you assess your workspace safety before starting repairs?

Credit: www.youtube.com
Tools And Materials Needed
Having the right tools and materials makes cleaning your mower battery terminals easier and safer. Without them, you might struggle to remove corrosion or accidentally damage parts. Let’s look at what you need to get the job done efficiently.
Cleaning Brushes
A small wire brush or a dedicated battery terminal brush works best to scrub away corrosion. These brushes have stiff bristles designed to clean metal surfaces without causing harm. If you don’t have a wire brush, an old toothbrush can work in a pinch, but it may require more effort.
Baking Soda And Water
Mixing baking soda with water creates a mild, effective cleaning solution that neutralizes battery acid and loosens grime. This simple mixture is safer than harsh chemicals and easily available in most homes. Just add a tablespoon of baking soda to a cup of water and stir until dissolved.
Protective Cloths
Protective cloths or rags help keep your workspace clean and absorb any spills during the cleaning process. Using old towels or shop rags is ideal since they can get dirty without worry. Gloves are also a good idea to protect your skin from battery acid and debris.
Inspecting The Battery
Inspecting the battery is a crucial step before you begin cleaning mower battery terminals. A thorough check helps you spot issues that could affect your mower’s performance or even safety. Taking the time to carefully examine the battery can save you from unexpected breakdowns and costly repairs.
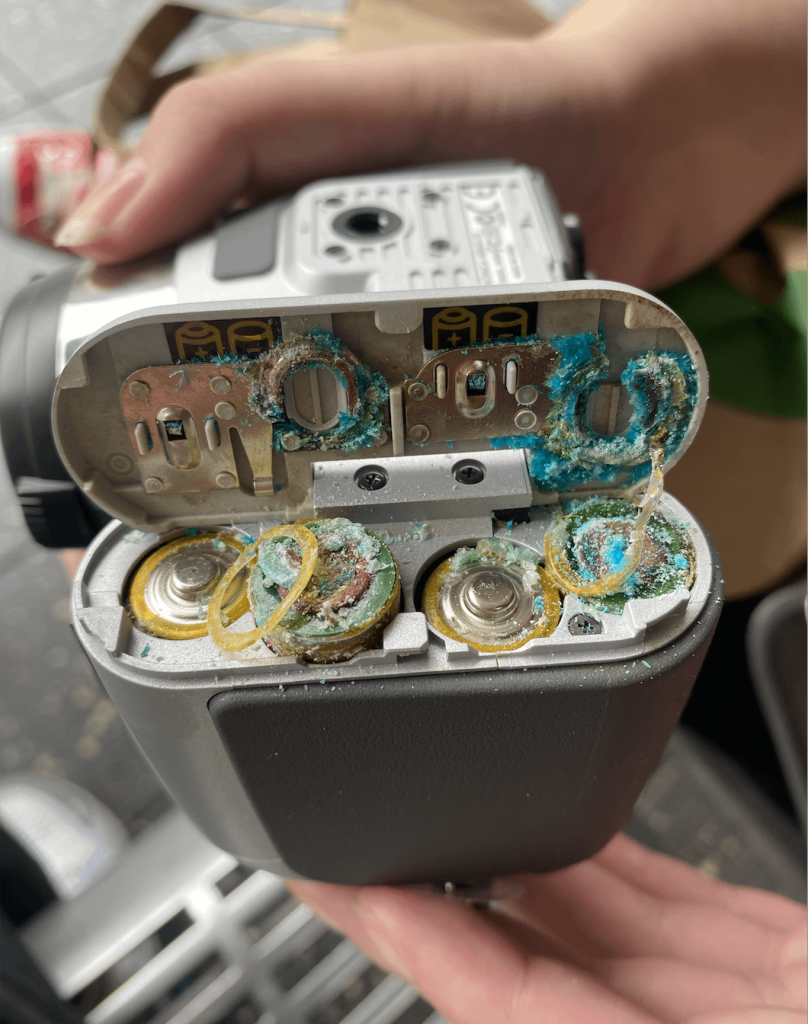
Check For Corrosion
Look closely at the battery terminals and cables for any white, blue, or green powdery substance. This corrosion can block the electrical connection and reduce power. If you see corrosion, it’s a clear sign that cleaning is necessary, but it also signals that your battery may need more regular maintenance.
Look For Damage
Inspect the battery case and terminals for cracks, leaks, or bulges. Damage like this can lead to acid leaks or electrical shorts, which are dangerous. If you spot any physical damage, it’s best to replace the battery rather than just clean it.
Assess Terminal Condition
Check if the terminals are loose, bent, or worn out. Terminals that don’t fit tightly can cause starting problems or intermittent power loss. Tighten any loose connections and consider replacing severely worn terminals to ensure a solid electrical connection.
Cleaning Steps
Disconnect the battery cables and clean corrosion with a baking soda solution. Scrub terminals gently, rinse with water, and dry completely before reconnecting. Ensure tight connections for better mower performance.
Cleaning your mower battery terminals keeps your mower running smoothly. Corroded terminals can hinder performance and cause starting issues. Follow these simple steps to clean your mower battery terminals effectively.Prepare Cleaning Solution
Create a simple cleaning solution at home. Mix baking soda with water. Use one tablespoon of baking soda per cup of water. Stir until the baking soda dissolves completely. This mixture neutralizes battery acid and aids in cleaning.Apply Solution To Terminals
Dip a brush or cloth into the solution. Gently apply it to the battery terminals. Make sure the solution covers all corroded areas. The baking soda will start to fizz. This reaction loosens the corrosion.Scrub Away Corrosion
Use a wire brush to scrub the terminals. Focus on areas with visible corrosion. Scrub until the corrosion is gone. Be gentle to avoid damaging the terminals. This step ensures a clean and effective connection.Rinse And Dry Terminals
Rinse the terminals with clean water. Remove any leftover baking soda residue. Use a clean cloth to dry the terminals thoroughly. Ensure no moisture remains on the battery. Dry terminals prevent further corrosion and ensure a good connection.Preventing Future Corrosion
Preventing future corrosion on mower battery terminals is key to keeping your mower reliable. Corrosion can block power flow and shorten battery life. Simple actions help stop corrosion before it starts. Regular care saves time and money over the long run.
Apply Protective Grease
After cleaning the terminals, apply a thin layer of protective grease. This creates a barrier against moisture and air. Use dielectric grease or petroleum jelly for best results. Spread it evenly on the terminals and battery posts. This step reduces the chance of corrosion forming again.
Regular Maintenance Tips
- Check battery terminals every month for signs of corrosion.
- Clean terminals immediately if you spot white or green buildup.
- Tighten loose battery connections to prevent sparks and corrosion.
- Keep the battery area dry and free of dirt or debris.
Routine checks help catch problems early. Small efforts keep your mower ready to start anytime.
Proper Battery Storage
Store the battery in a cool, dry place during off-season months. Avoid extreme temperatures, which speed up corrosion. Remove the battery from the mower if you will not use it for a long time. Use a battery maintainer or trickle charger to keep it charged. A well-stored battery lasts longer and stays cleaner.
Reconnecting The Battery
Reconnecting the mower battery is a crucial step after cleaning the terminals. Proper reconnection ensures the mower starts easily and runs well. Follow the right steps to avoid damage and keep the battery in good shape.
Attach Terminals Securely
Place the positive terminal back on the positive battery post. Tighten the clamp firmly so it does not move. Repeat with the negative terminal on the negative post. Loose connections cause starting problems and electrical issues. Use a wrench to ensure both terminals are snug but avoid overtightening.
Test The Battery
Turn on the mower’s ignition to check the battery connection. The engine should crank without hesitation. If it does not start, check the terminals again for tightness. Look for any signs of corrosion or damage. Confirm the battery holds a charge and delivers power correctly.
Final Safety Check
Make sure no tools or metal objects touch the battery posts. Check for secure battery hold-down to prevent movement during use. Clean any spilled acid or debris around the battery area. Wear gloves and eye protection throughout this process for safety. Proper care extends battery life and mower reliability.

Credit: www.lokithorshop.com
Frequently Asked Questions
How Do I Clean Mower Battery Terminals Safely?
To clean mower battery terminals safely, disconnect the battery first. Use a mixture of baking soda and water to scrub corrosion gently. Wear gloves and eye protection. Rinse with clean water and dry completely before reconnecting.
What Tools Are Needed For Cleaning Battery Terminals?
You need a wire brush, baking soda, water, gloves, and a cloth. A wrench may be required to disconnect the battery terminals. These tools help remove corrosion and ensure a secure connection.
How Often Should Mower Battery Terminals Be Cleaned?
Clean mower battery terminals every 6 months or when corrosion appears. Regular cleaning prevents poor connections and extends battery life. Check terminals more often in humid or wet conditions.
Can I Use Vinegar To Clean Battery Terminals?
Yes, vinegar can clean battery terminals due to its acidity. Apply vinegar with a brush to dissolve corrosion. Rinse thoroughly with water and dry before reconnecting. Baking soda is a safer alternative.
Conclusion
Cleaning mower battery terminals keeps your mower running well. Dirt and corrosion can stop power flow. Regular cleaning helps avoid starting problems. Use simple tools and safety gear for the job. Check terminals often to catch buildup early. A clean battery means longer mower life and better performance.
Stay safe and keep your mower ready for every season. Easy steps, big benefits.


