If your John Deere riding mower isn’t starting or is acting up, the solenoid might be the problem. Knowing how to check the solenoid yourself can save you time and money.
In this guide, you’ll learn simple steps to test your solenoid quickly and easily. By the end, you’ll feel confident diagnosing this common issue and getting your mower back to work. Keep reading to find out how to keep your mower running smoothly without unnecessary repairs.

Credit: www.youtube.com
Identify The Solenoid Location
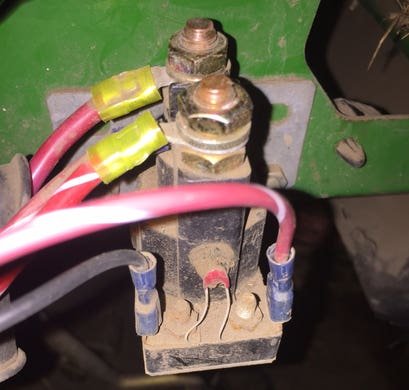
Finding the solenoid on a John Deere riding mower is the first step to checking its condition. The solenoid acts as a switch that controls the power from the battery to the starter. Knowing its location helps in quick inspection and repair. Solenoids are usually easy to spot once you know where to look.
The solenoid is often near the battery or starter motor. It looks like a small cylindrical or square box with wires connected to it. Some models place the solenoid inside a cover or under the mower’s hood. Identifying its exact position saves time and avoids confusion during maintenance.
Common Solenoid Positions On John Deere Mowers
- Near the battery, mounted on the frame or fender
- Close to the starter motor under the mower deck or hood
- Attached to the engine block or firewall
- Inside a plastic or metal housing for protection
Tools Needed For Access
- Screwdriver to remove covers or panels
- Socket wrench set for bolts holding the solenoid
- Flashlight to see in dark or tight spaces
- Gloves to protect hands during inspection
Prepare The Mower For Testing
Before you start testing the solenoid on your John Deere riding mower, it’s important to get the machine ready properly. Preparing the mower ensures your safety and the accuracy of your test results. Taking time here will save you from potential mishaps and help you diagnose the issue more effectively.
Ensure Safety Precautions
Safety should always be your top priority. Make sure your mower is parked on a flat, stable surface to prevent any accidental movement. Remove any loose clothing or jewelry that could get caught in moving parts.
Wear protective gloves and safety glasses to shield your hands and eyes. Avoid working near flammable materials since electrical sparks can occur during solenoid testing. Have a fire extinguisher nearby just in case.
Disconnect The Battery
Disconnecting the battery is a crucial step before testing the solenoid. It stops accidental electrical shorts and prevents the mower from starting unexpectedly. Locate the battery terminals—usually under the seat or hood.
Using a wrench, first disconnect the negative (black) terminal, then the positive (red) terminal. This order reduces the risk of sparks. Keep the battery cables separated to avoid accidental contact while you work.
Have you ever tried testing electrical components without disconnecting the battery? It’s a quick way to get shocked or damage sensitive parts. Taking this simple step can save you a lot of trouble and keep your mower in good shape.
Visual Inspection Of The Solenoid
Visual inspection of the solenoid on your John Deere riding mower is a straightforward yet crucial step to ensure it functions properly. Before diving into electrical testing, simply looking over the solenoid and its connections can often reveal obvious issues that cause starting problems. This quick check can save you time and effort by pinpointing visible signs of trouble early.
Check For Corrosion Or Damage
Look closely at the solenoid’s metal parts for any signs of rust or corrosion. Corrosion can block electrical current and prevent the mower from starting. Also, examine the solenoid casing for cracks, dents, or other physical damage that might affect its operation.
If you spot any green or white powdery buildup, that’s a clear sign of corrosion. It’s a good idea to clean these areas gently with a wire brush or sandpaper. Ask yourself: could this corrosion be the reason your mower struggles to start?
Inspect Wiring And Connections
Check every wire connected to the solenoid for frayed insulation, broken strands, or loose connections. Loose or damaged wires can cause intermittent power issues or a complete failure to start. Tug gently on each wire to ensure it’s firmly attached.
Look at the terminals where wires connect to the solenoid. Are they tight and free of dirt or corrosion? Dirty or loose terminals can interrupt the electrical flow and stop your mower in its tracks.
Keeping these connections clean and secure often fixes many solenoid-related problems. Have you checked your wiring connections lately?
Test Solenoid With A Multimeter
Testing the solenoid on your John Deere riding mower with a multimeter is a straightforward way to diagnose starting issues. This test helps you determine if the solenoid is functioning correctly or if it needs replacement. Before you begin, make sure your multimeter is ready and set to the right mode for accurate readings.
Set Multimeter To Proper Settings
First, turn on your multimeter and set it to measure continuityor resistance (ohms). Continuity mode is often represented by a sound wave or diode symbol. If your multimeter doesn’t have continuity mode, use the lowest resistance setting available.
Make sure the multimeter leads are plugged in correctly: the black lead goes into the common (COM) port, and the red lead goes into the voltage/resistance port. This setup ensures accurate readings and prevents damage to your device.
Measure Continuity And Resistance
To check continuity, touch the multimeter leads to the solenoid terminals. If the solenoid coil is good, you should hear a beep or see a low resistance reading, typically between 0.2 to 2 ohms. No beep or a very high resistance reading means the coil may be damaged or broken.
Next, check the solenoid’s switch contacts by measuring resistance across the large terminals while activating the solenoid (you might need a helper to turn the key). A good solenoid will show nearly zero resistance when engaged, indicating the switch closes properly.
Have you noticed your mower struggles to start on cold mornings? Testing the solenoid this way can quickly confirm if it’s the weak link. This simple check saves you from unnecessary replacements and keeps your mower ready for action.
Perform A Voltage Test
Performing a voltage test is a key step to check the solenoid on your John Deere riding mower. It helps identify if the solenoid receives the correct power from the battery. This test shows if the solenoid is working or needs replacement.
Use a multimeter to measure voltage at specific points on the solenoid. This process ensures the electrical system functions well and the mower starts properly. Follow these steps carefully for accurate results.
Check Battery Voltage At The Solenoid
Locate the solenoid near the battery or starter. Set your multimeter to measure DC voltage. Connect the red lead to the solenoid’s battery terminal. Attach the black lead to a good ground point on the mower.
The reading should match the battery voltage, usually around 12 volts. A lower voltage means a weak battery or poor connection. Check battery cables and clean any corrosion. Ensure tight and secure battery terminals.
Test Voltage When Engaging The Key
Turn the mower key to the start position. Keep the multimeter leads on the solenoid terminals. Look for a voltage reading on the starter terminal of the solenoid.
This voltage should appear briefly when starting. It signals the solenoid is activating and sending power to the starter. No voltage means a faulty solenoid or ignition switch. Repeat the test to confirm results.
Listen And Feel For Solenoid Activation
Listening and feeling for solenoid activation helps diagnose your John Deere riding mower’s starting issues. The solenoid acts like a switch. It sends power from the battery to the starter motor. When working properly, you can hear and feel its action. This test requires no special tools and can quickly reveal problems.
Try this test in a quiet place. Turn the key to the start position. Pay close attention to sounds and vibrations near the solenoid.
Audible Click Sound
The solenoid produces a clear click when it activates. This click means the solenoid is engaging the starter. A weak or missing click suggests a problem.
- Listen carefully near the solenoid location.
- A sharp click indicates good electrical connection.
- No click could mean a dead battery or faulty solenoid.
Vibration Or Movement Indicators
Along with the click, you may feel a slight vibration or movement. This happens as the solenoid pushes the starter gear forward.
- Place your hand gently on the solenoid housing.
- Feel for a quick twitch or vibration when starting.
- No movement often points to a worn solenoid or loose wiring.
Bypass The Solenoid For Final Check
Bypassing the solenoid on your John Deere riding mower helps confirm if the solenoid is the issue. This step provides a direct way to test the mower’s electrical circuit. It allows power to flow straight to the starter, skipping the solenoid. This check can save time and prevent unnecessary part replacements.
How To Safely Bypass
- Turn off the mower and remove the key.
- Locate the solenoid, usually near the battery.
- Use a heavy-duty screwdriver or a jumper wire.
- Connect the solenoid’s battery terminal to the starter terminal.
- Hold the connection firmly to avoid sparks.
- Turn the key to the start position while bridging the terminals.
- Do not touch any metal parts during this step.
- Wear gloves and eye protection for safety.
Interpreting The Results
If the engine turns over during the bypass, the solenoid likely needs replacement. No engine response means the problem may be the starter or other electrical parts. Sparks or no sound suggest a possible wiring issue. Repeat the test carefully to confirm results. Use this check to focus your next repair steps.

Credit: www.searshomeservices.com
Replace Or Repair The Solenoid
Replacing or repairing the solenoid on your John Deere riding mower can save you time and money compared to taking it to a professional. Knowing when to repair and when to replace is key. If your solenoid is corroded, burnt, or fails continuity tests, replacement is usually the better option. But sometimes a thorough cleaning and tightening of connections can restore its function.
Choosing The Right Replacement Part
Not all solenoids are created equal. Make sure the replacement solenoid matches your mower’s model number and electrical specifications exactly. Using a solenoid with different voltage or terminal layout can cause further damage.
Look for OEM (Original Equipment Manufacturer) parts for the best fit and durability. After-market solenoids may be cheaper, but they might not last as long or fit properly.
Check the terminals—some solenoids have two, others have three or more. Pick one that matches your mower’s wiring setup to avoid rewiring headaches.
Step-by-step Replacement Guide
- Disconnect the mower’s battery to prevent any accidental shorts.
- Locate the solenoid; it’s typically near the battery or starter motor.
- Use a wrench or screwdriver to remove the bolts holding the solenoid in place.
- Carefully disconnect the wires, noting where each one goes for reassembly.
- Install the new solenoid by connecting the wires exactly as before.
- Secure the solenoid with bolts and ensure it’s firmly mounted.
- Reconnect the battery and test your mower to see if it starts properly.
Have you noticed any unusual clicking or failure to start after replacing the solenoid? That could mean a wiring issue or a faulty new solenoid. Double-check your connections before assuming the replacement part is defective.
Preventive Maintenance Tips
Keeping your John Deere riding mower’s solenoid in top shape means less downtime and more mowing time. Preventive maintenance helps you spot issues early, avoiding costly repairs and extending the life of your mower. Let’s focus on two key habits that make a big difference.
Regular Cleaning And Inspection
Dirt, grass clippings, and debris can quickly build up around the solenoid, causing poor connections or overheating. Take a few minutes after each use to clean the solenoid area gently with a brush or compressed air. This simple step prevents grime from creating electrical problems that stop your mower from starting.
Inspect the solenoid terminals regularly for corrosion or loose wires. Even slight corrosion can interfere with the current flow. Tighten connections carefully and use a wire brush to remove any rust or buildup.
Battery Care To Extend Solenoid Life
Your mower’s battery plays a crucial role in solenoid performance. A weak or dying battery can cause the solenoid to work harder, leading to premature failure. Keep your battery terminals clean and ensure the battery is fully charged before each mowing session.
Consider testing your battery voltage with a multimeter every few weeks. If you notice your mower struggles to start or the solenoid clicks weakly, it’s a sign the battery may need attention. Could regular battery checks be the key to avoiding unexpected mower breakdowns?

Credit: www.greentractortalk.com
Frequently Asked Questions
How Do I Test The Solenoid On A John Deere Mower?
To test the solenoid, use a multimeter to check for continuity and voltage. Ensure the mower’s battery is fully charged and connections are clean.
What Tools Are Needed To Check A John Deere Solenoid?
You need a multimeter, wrench set, and screwdriver. These tools help measure voltage and remove the solenoid for inspection.
Why Is My John Deere Mower Solenoid Not Working?
A faulty solenoid may have corroded terminals, worn contacts, or electrical issues. Checking connections and replacing a defective solenoid often solves the problem.
How Can I Identify A Bad Solenoid On My Mower?
Signs include clicking sounds without engine start, no power to starter, or mower not cranking. Testing voltage helps confirm solenoid failure.
Conclusion
Checking the solenoid on your John Deere riding mower helps keep it running well. Use the steps shared here to test it safely and clearly. Knowing how to check this part saves time and money on repairs. Regular checks catch problems early and avoid big issues.
Keep your mower in good shape by staying alert to its needs. Maintenance is simple when you understand your machine’s parts. Taking care of your mower means it works longer and better. Give your mower the attention it needs to perform its best.