Are you looking to boost your engine’s performance and save money on repairs? Knowing how to gap a spark plug correctly is one of the simplest yet most powerful skills you can learn.
When your spark plugs have the right gap, your engine runs smoother, starts easier, and uses fuel more efficiently. If you’ve ever wondered why your car isn’t running at its best or want to keep your vehicle in top shape, this guide is for you.
Keep reading to discover easy steps that will help you gap your spark plugs like a pro—no special tools or experience needed!
Spark Plug Gap Basics
Understanding the basics of spark plug gap is key to keeping engines running smoothly. The gap affects how well the spark plug ignites the air-fuel mix inside the engine. A correct gap ensures efficient combustion and better engine performance. This section explains what spark plug gap means and why its size is important.
What Is Spark Plug Gap
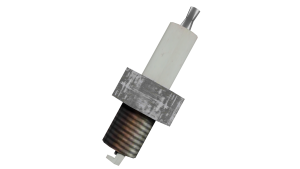
The spark plug gap is the distance between the center and ground electrode. This space allows the spark to jump and ignite the fuel mixture. Each engine needs a specific gap size for proper ignition. The gap size is measured in thousandths of an inch or millimeters. Too small or too large a gap can cause engine problems.
Why Gap Size Matters
The right gap size ensures a strong spark and good combustion. A smaller gap can cause weak sparks, leading to misfires and poor fuel use. A larger gap needs more voltage to jump, which can strain the ignition system. Correct gap size helps improve fuel efficiency and reduces emissions. It also prevents engine roughness and starting issues.
Tools Needed For Gapping
To gap a spark plug correctly, having the right tools is essential. Without proper equipment, you might damage the spark plug or end up with an incorrect gap, leading to poor engine performance. Knowing which tools to use can save you time and ensure your vehicle runs smoothly.
Gap Gauge Types
There are several types of gap gauges you can use to measure and adjust the spark plug gap. The most common ones include:
- Feeler Gauge:Thin metal strips of varying thickness are used to measure the gap precisely. They offer accurate readings but require careful handling.
- Wire Gauge:A flexible wire loop that you slide between the electrodes to check the gap size. It’s easier to use but less precise than feeler gauges.
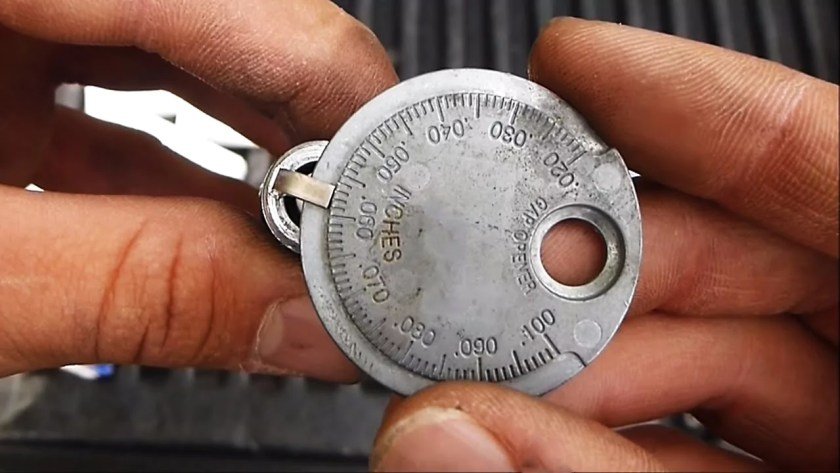
- Coin-Style Gauge:A flat, coin-shaped tool with notches representing different gap sizes. It’s simple and quick for rough measurements.
Choosing the right gauge depends on your comfort level and the precision needed. Have you ever struggled with a spark plug gap that just wouldn’t feel right? Using the correct gauge can make all the difference.
Additional Helpful Tools
Besides the gap gauge, a few other tools make the job easier and prevent damage. A spark plug gapping tool with a bending arm helps you gently adjust the electrode without breaking it.
Needle-nose pliers are handy if you don’t have a dedicated gapping tool. Just be cautious to apply gentle pressure. A clean rag is also useful to wipe the spark plug clean before and after adjusting the gap.
Do you keep these tools in your basic automotive toolkit? If not, adding them can save frustration next time you check or replace your spark plugs.
Preparing The Spark Plug
Preparing your spark plug before gapping is essential for optimal engine performance. A clean, undamaged spark plug ensures the gap setting will be accurate and effective. Taking the time to clean and inspect the plug can save you from engine misfires and poor fuel economy down the road.
Cleaning The Spark Plug
Start by removing any dirt, oil, or carbon deposits from the spark plug’s surface. Use a wire brush or a spark plug cleaner to gently scrub the electrodes and threads. Avoid harsh chemicals that might damage the ceramic insulator.
If you notice stubborn deposits, a soak in a mild solvent can help loosen the grime. Be sure the plug is completely dry before you proceed to gapping. Have you ever tried gapping a dirty spark plug only to find the engine still runs rough? Cleaning first can prevent that frustration.
Inspecting For Damage
After cleaning, closely check the spark plug for cracks, chips, or worn electrodes. A damaged plug can cause misfires no matter how perfectly you set the gap. Look for signs of corrosion or burning on the metal parts as well.
If you see any damage, replacing the spark plug is safer and more cost-effective than risking engine trouble. Don’t overlook tiny cracks in the ceramic insulator—they can lead to engine performance issues. Have you ever ignored small damage, only to face bigger problems later?
Measuring The Gap
Measuring the gap on a spark plug is a crucial step to ensure your engine runs smoothly and efficiently. The gap affects the spark’s strength and timing, impacting fuel combustion. Getting this measurement right can save you from misfires and poor engine performance.
Using A Feeler Gauge
A feeler gauge is a simple tool made up of thin metal blades of different thicknesses. To measure the gap, select a blade that matches the specified gap for your spark plug.
Slide the blade gently between the electrodes of the spark plug. If it fits snugly without forcing, you’ve found the correct gap. Too tight or too loose? Adjust by carefully bending the ground electrode.
I once ignored this step and ended up with a weak spark that caused rough idling. Measuring with a feeler gauge gave me the precision I needed to fix the problem immediately.
Using A Gap Tool
A gap tool is designed specifically for spark plugs, often combining a wire loop and a tapered gauge. Insert the wire loop between the electrodes to check the gap.
Pull the tool through the gap; it should meet the resistance specified in your spark plug’s manual. If it’s too loose, gently bend the electrode inward; if too tight, bend it outward.
This tool offers a quick and easy way to get consistent results, especially if you’re working on multiple spark plugs. Have you noticed how small adjustments here can significantly improve your engine’s responsiveness?
Adjusting The Gap
Adjusting the gap on a spark plug is a key step to ensure your engine runs smoothly and efficiently. The gap affects how the spark ignites the fuel-air mixture, so getting it just right is crucial. Let’s look at how you can carefully increase or decrease this gap to match your engine’s needs.
Increasing The Gap
To increase the gap, you need to gently bend the ground electrode away from the center electrode. Use a spark plug gap tool or a small flathead screwdriver for this task.
Start by placing the tool between the electrodes and carefully pry the ground electrode outward. Do this slowly and check the gap frequently with a feeler gauge to avoid over-widening it.
Keep in mind, increasing the gap too much can cause the spark to become weak or inconsistent. Have you ever experienced rough engine starts or misfires? That might be a sign your spark plug gap is too wide.
Decreasing The Gap
When the gap is too large, you’ll need to close it by pushing the ground electrode closer to the center. Use the flat part of your gap tool or a pair of needle-nose pliers for better control.
Apply gentle pressure to bend the electrode inward, then measure the gap with a feeler gauge. It’s better to make small adjustments and recheck often than to force it and risk damaging the electrode.
Remember, a gap that’s too small can cause weak sparks and poor combustion. Have you noticed a drop in your engine’s power or fuel efficiency? Tightening the gap might just fix that issue.

Credit: www.youtube.com
Checking The Gap Again
Checking the gap again is a crucial part of setting a spark plug correctly. It ensures the gap is just right for the engine to run smoothly. A perfect gap helps the spark ignite the fuel-air mix efficiently. This step saves time and prevents engine problems later. Never skip this important check after adjusting the gap.
Ensuring Accuracy
Use a feeler gauge to measure the gap precisely. Insert the correct thickness blade between the electrodes gently. The blade should slide in with slight resistance. Too tight or too loose means the gap needs more adjustment. Check the gap from different angles to avoid mistakes. Repeat measuring until the gap matches the manufacturer’s specification exactly.
Common Mistakes To Avoid
- Forcing the feeler gauge in too hard can bend the electrodes.
- Measuring only once may miss small errors in the gap size.
- Using a worn or wrong size gauge leads to inaccurate readings.
- Adjusting the gap by bending the side electrode too much weakens it.
- Skipping the final check after adjusting causes engine misfires.
Installing The Spark Plug
Installing the spark plug correctly is key to ensuring your engine runs smoothly and efficiently. This step requires more than just screwing the plug into place—you need to apply the right techniques to avoid damage and guarantee a secure fit. Let’s dive into what you should focus on during installation to keep your engine firing perfectly.
Proper Tightening Techniques
Start by threading the spark plug in by hand. This prevents cross-threading, which can ruin the cylinder head and lead to costly repairs.
Use a torque wrench to tighten the spark plug to the manufacturer’s recommended specification. Over-tightening can strip the threads or break the plug, while under-tightening may cause poor engine performance or gas leaks.
If you don’t have a torque wrench, tighten the plug until it feels snug, then give it an extra 1/8 to 1/4 turn. This approach worked well for me during a last-minute tune-up, but be cautious—it’s always safer to use the exact torque value.
Final Performance Tips
- Double-check the gap before installation. Even a small deviation can affect combustion efficiency.
- Apply a small amount of anti-seize compound to the threads if recommended by your spark plug manufacturer. This makes future removal easier and prevents thread damage.
- Inspect the spark plug boot and wire for cracks or wear. A poor connection can mimic spark plug issues and waste your efforts.
Have you noticed your engine hesitating or misfiring after replacing spark plugs? It might be time to revisit the installation steps. Proper tightening and final checks can save you from unnecessary troubleshooting.

Credit: www.youtube.com

Credit: www.youtube.com
Frequently Asked Questions
What Tools Do I Need To Gap A Spark Plug?
You need a spark plug gap tool, feeler gauge, and sometimes a wire-type gauge. These tools measure and adjust the gap accurately.
How Do I Measure The Spark Plug Gap Correctly?
Use the gap tool to slide between electrodes. The tool should fit snugly without forcing. Adjust if the gap is too wide or narrow.
Why Is Proper Spark Plug Gap Important?
Correct gap ensures optimal ignition and engine performance. Too wide or narrow gaps cause misfires, poor fuel efficiency, and increased emissions.
Can I Gap A Spark Plug Without Removing It?
It’s best to remove the spark plug for accurate gapping. Gapping in place may lead to incorrect measurements or damage.
Conclusion
Gapping a spark plug is crucial for engine performance. It ensures efficient fuel combustion. Incorrect gaps can lead to engine issues. Always use a feeler gauge for accuracy. Check your vehicle’s manual for specific gap sizes. Regularly inspect and adjust your spark plugs.
This simple task can save you from costly repairs. Consistent maintenance extends your engine’s life. It also improves fuel efficiency. So, take the time to gap your spark plugs correctly. Your engine will thank you for it.