Is your riding mower refusing to start just when you need it most? It can be frustrating, especially when your yard work is waiting.
But don’t worry—you can bring it back to life quickly and safely. This guide will show you exactly how to jump start your riding mower, step by step. By the end, you’ll have the confidence to tackle this common problem without calling for help.
Ready to get your mower running again? Let’s dive in.

Credit: www.youtube.com
Prepare The Mower
Preparing your riding mower properly ensures a smooth and safe jump start. Taking time to check key parts helps avoid damage and improves performance. Focus on fuel, oil, battery, and the surrounding area before starting the process.
Check Fuel And Oil
Confirm the mower has enough fuel. Old or contaminated fuel can cause problems. Drain and refill if the fuel smells bad or looks dark. Check the oil level with the dipstick. Add oil if it is low. Use the type of oil recommended in the mower’s manual.
Inspect The Battery
Look at the battery terminals for corrosion or dirt. Clean them with a brush if needed. Ensure the battery connections are tight and secure. Check the battery charge with a tester. Replace the battery if it cannot hold a charge.
Clear The Area
Remove any debris, grass, or objects around the mower. Make sure the mower is on a flat, stable surface. Keep children and pets away during jump starting. Clear space helps prevent accidents and allows easy access to the battery.
Gather Necessary Tools
Gathering the right tools is the first step to jump start a riding mower safely. Without proper equipment, the process can be risky or may not work at all. Prepare everything before you begin to save time and avoid mistakes.
Having all tools ready helps the jump start go smoothly. It also protects you and your mower from damage. Focus on these essential items to get started.
Get Jumper Cables
Jumper cables connect the dead battery to a power source. Choose cables long enough to reach both vehicles or batteries. Inspect the cables for any damage or corrosion before use. Clean clamps ensure a good connection and better current flow.
Find A Second Vehicle Or Battery
A running vehicle or a fully charged battery provides the power needed. The second vehicle should have a 12-volt battery like the mower. Park the vehicle close enough for the jumper cables to reach. Turn off both engines before connecting the cables.
Wear Safety Gear
Safety gear protects you from sparks and battery acid. Wear gloves to shield your hands. Use safety glasses to guard your eyes. Avoid loose clothing that might get caught during the process. Stand clear of the batteries while connecting and disconnecting cables.
Connect Jumper Cables Safely
Connecting jumper cables safely is crucial to avoid damage to your riding mower or personal injury. Handling the cables with care ensures a smooth jump start without sparks or short circuits. Let’s focus on the right way to attach each clamp and verify your connections before powering up.
Attach Positive Clamps
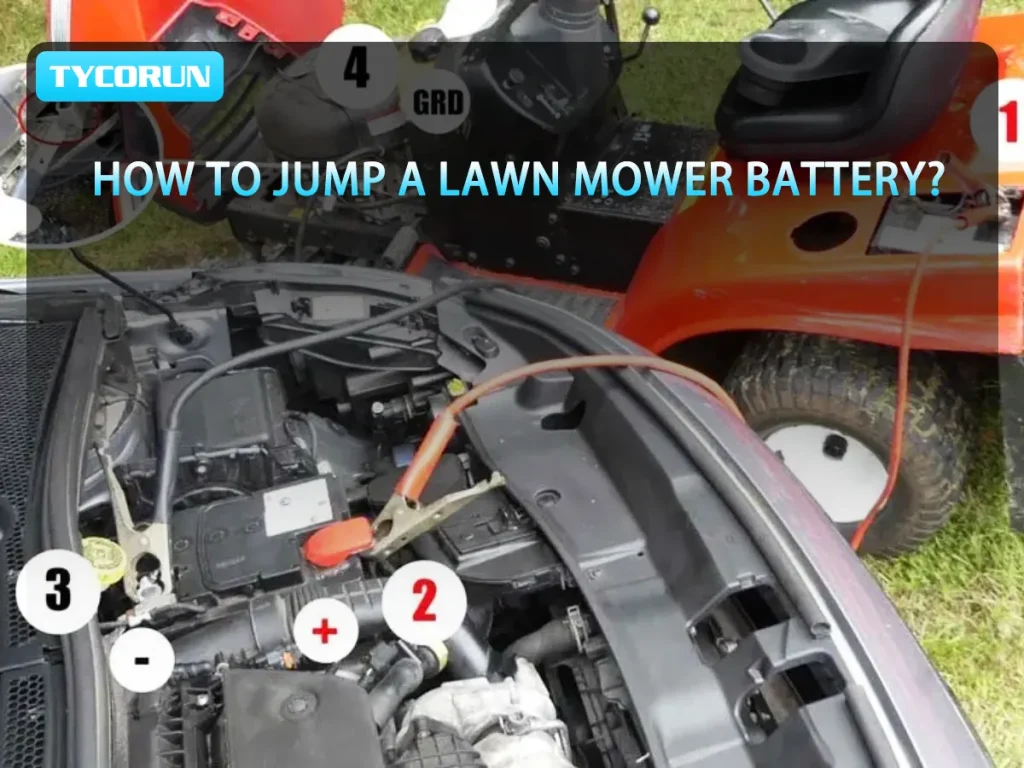
Start by locating the positive terminal on your riding mower’s battery—usually marked with a plus (+) sign or red cover. Attach the red jumper cable clamp firmly to this terminal. Next, connect the other red clamp to the positive terminal of the donor battery or vehicle.
Make sure the clamps grip securely without slipping. Loose connections can cause sparks and prevent the mower from starting. Have you ever struggled with clamps that won’t stay in place? Using a clamp with a strong spring helps maintain a steady hold.
Attach Negative Clamps
Find the negative terminal on the donor battery, marked with a minus (-) sign or black cover. Connect the black jumper cable clamp to this terminal first. Then, instead of attaching the other black clamp to the mower’s negative terminal, clip it to an unpainted metal surface on the mower’s frame.
This grounding step reduces the risk of sparks near the battery, which can be dangerous. Look for a sturdy bolt or metal part away from the battery. Have you checked your mower’s manual to identify the best grounding spot?
Ensure Proper Connection
- Double-check that clamps are not touching each other or any moving parts.
- Confirm each clamp is attached to the correct terminal—mixing positives and negatives can cause serious damage.
- Keep cable wires clear of the mower’s belts and blades to avoid accidents.
Taking a moment to inspect your setup before starting can save you from costly repairs or injury. Do you feel confident that your connections are secure and safe? A quick visual check can make all the difference.

Credit: www.searspartsdirect.com
Start The Mower
Check the battery connections to ensure they are clean and tight. Connect jumper cables from a charged battery to the mower’s battery carefully. Turn the ignition key and wait for the engine to start smoothly.
Starting your mower after a long break can be a challenge. A jump start might be the solution. Let’s guide you on how to start your mower effectively.Start The Donor Vehicle
Connect the donor vehicle’s battery to the mower’s battery. Use jumper cables for the connection. Attach the red cable to the positive terminals first. Then, connect the black cable to the negative terminals. Ensure the connections are tight and secure. Start the engine of the donor vehicle. Let it run for a few minutes. This will charge the mower’s battery.Crank The Mower Engine
Turn the mower’s ignition key to start the engine. Do this while the donor vehicle is running. Listen for the sound of the mower engine cranking. If it cranks, your connection is good. If not, check the cable connections. Ensure all cables are attached correctly. Try turning the key again if needed.Let The Mower Run
Once the mower starts, let it run. Keep the engine running for at least 15 minutes. This helps recharge the battery. Disconnect the jumper cables carefully. Remove the black cable first, then the red. Make sure the cables don’t touch each other or any metal. Your mower is now ready for use.Disconnect Jumper Cables
After jump starting your riding mower, disconnecting the jumper cables safely is key. This step prevents damage to the mower and keeps you safe. Handle the cables carefully to avoid any accidents.
Remove Negative Clamps First
Start by taking off the negative clamps. These are usually black and connected to the negative battery terminal. Removing them first reduces the risk of short circuits.
Remove Positive Clamps
Next, remove the positive clamps. These are usually red and attached to the positive battery terminal. Be gentle to avoid damaging the battery or cables.
Avoid Sparks
Keep the cable ends away from metal surfaces. Sparks can cause injuries or damage the mower’s electrical system. Hold the clamps firmly and separate them carefully.
Troubleshoot Common Issues
Troubleshooting common issues with your riding mower can save you time and frustration. Knowing what to check first helps you get back to mowing without unnecessary delays. Let’s focus on three frequent problems that might stop your mower from starting and how to identify them quickly.
Battery Won’t Charge
If your mower won’t start, the battery might be the culprit. Check if the battery terminals are clean and tightly connected. Dirt or corrosion can prevent proper charging.
Try charging the battery with a compatible charger. If it fails to hold a charge, the battery may need replacement. Have you checked the battery voltage with a multimeter? It can tell you if the battery is healthy or dead.
Starter Problems
Sometimes, the engine won’t crank because of starter issues. Listen for a clicking sound when you turn the key—this often signals a faulty starter solenoid or motor. If there’s silence, the starter might not be receiving power.
Inspect the wiring to the starter for any loose or damaged connections. You can also test the starter by bypassing the solenoid with a screwdriver carefully. Does your mower respond when you do this? It’s a quick way to pinpoint the problem.
Electrical Faults
Electrical faults can be tricky since they affect various parts of the mower. Look for blown fuses or damaged wiring harnesses first. These can interrupt the starting sequence without obvious signs.
Use a wiring diagram to trace circuits related to the ignition and safety switches. Faulty safety switches, like the seat or brake switch, often prevent the mower from starting. Have you ever noticed your mower won’t start unless you’re seated? That’s the safety switch doing its job, but if it’s malfunctioning, it can keep your mower silent.
Prevent Future Battery Problems
Preventing future battery problems keeps your riding mower ready for use. A well-maintained battery lasts longer and avoids sudden failures. Simple daily habits protect your mower’s battery and save repair costs.
Regular Battery Maintenance
Check battery terminals for dirt and corrosion often. Clean terminals using a mix of baking soda and water. Tighten loose connections to ensure a strong electrical link. Test battery voltage monthly with a voltmeter. Replace the battery if voltage drops below 12 volts.
Proper Storage Tips
Store the mower in a dry, cool place during winter. Disconnect the battery to prevent slow discharge. Use a battery maintainer or trickle charger to keep the battery full. Avoid places with extreme heat or cold to protect battery life.
Routine Engine Checks
Inspect the engine for oil leaks or damaged parts regularly. Replace worn belts and clean the air filter often. A well-running engine reduces battery strain at startup. Regular checks help catch problems before they affect the battery.

Credit: www.tycorunenergy.com
Frequently Asked Questions
How Do I Safely Jump Start A Riding Mower?
To safely jump start, connect the positive cable to the mower’s battery, then the vehicle’s battery. Attach the negative cable to a grounded metal surface on the mower. Avoid sparks and follow the correct cable order to prevent damage or injury.
What Tools Are Needed To Jump Start A Riding Mower?
You need jumper cables and a charged vehicle battery. A pair of gloves and safety glasses is recommended. Ensure the riding mower battery terminals are clean before connecting cables for a smooth and safe jump start process.
Why Won’t My Riding Mower Start After Jump Starting?
If it won’t start, check battery connections and cable attachments. The battery might be too drained or damaged. Also, inspect the ignition switch, fuel supply, and spark plug for issues that can prevent starting.
Can I Use A Car Battery To Jump Start My Mower?
Yes, a car battery can jump start a riding mower. Ensure the car is off before connecting cables. Use proper cable connection order and remove cables immediately after the mower starts to avoid damage.
Conclusion
Jump starting your riding mower is simple and quick. Follow the steps carefully to avoid damage. Always check the battery and cables first. Safety matters—wear gloves and keep sparks away. After the mower starts, let it run for a few minutes.
This helps charge the battery properly. Regular maintenance can prevent future starting problems. Keep your mower ready for any job. Now, you can get back to your lawn easily and fast.


