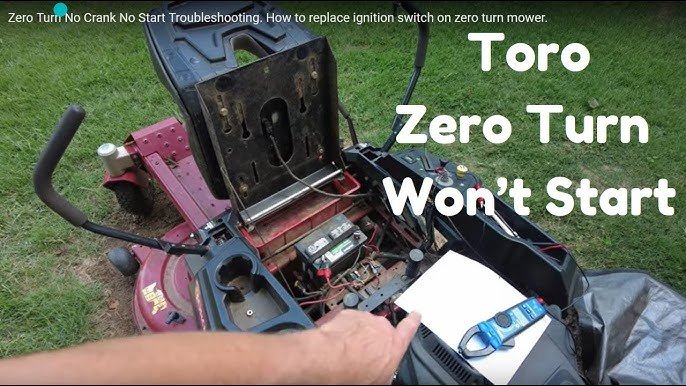
Is your mower refusing to start when you turn the key? The problem might be your ignition switch.
Knowing how to fix a mower ignition switch can save you time and money, and get your mower back to work quickly. In this guide, you’ll find simple steps that anyone can follow, even if you’re not a mechanic. Keep reading, and you’ll learn how to diagnose the issue and make the repair yourself—no need to call a professional or buy a new mower.
Let’s get your mower running smoothly again!
Signs Of A Faulty Ignition Switch
Recognizing the signs of a faulty ignition switch on your mower can save you time and frustration. This small but crucial component controls the power flow to your engine. If it starts acting up, your mower won’t perform as expected. Knowing what to look for helps you decide when it’s time to fix or replace the ignition switch before the problem worsens.
Engine Fails To Start
One of the most obvious signs is the engine refusing to start. When you turn the key or push the ignition button, nothing happens. You might hear a click, or sometimes no sound at all.
This usually means the ignition switch is not sending power to the starter motor. It’s like the electrical connection is broken inside the switch.
Have you ever been stuck, trying to start your mower multiple times with no luck? That’s a clear hint that the ignition switch might be the culprit.
Intermittent Power Loss
Your mower might start and run fine but then suddenly lose power without warning. This can be confusing because it works sometimes and fails other times.
Intermittent power loss often points to a worn or damaged ignition switch. The internal contacts might be loose or corroded, causing sporadic failures.
Think about how frustrating it is when your mower cuts off mid-job. Could this unpredictable behavior be due to a faulty switch?
Unresponsive Switch Movement
If the ignition switch feels loose or doesn’t move smoothly, it’s a bad sign. Turning the key should feel firm and precise, not wobbly or stuck.
A worn-out switch can lose its internal tension, making it unresponsive. This physical wear often leads to electrical issues as well.
Have you noticed your ignition key slipping or requiring extra force? This mechanical problem often precedes electrical failure, so don’t ignore it.
Credit: www.searspartsdirect.com
Tools And Materials Needed
Before you dive into fixing your mower’s ignition switch, having the right tools and materials at hand makes the job smoother and safer. Knowing exactly what you need saves time and spares you from frustrating interruptions. Let’s break down the essentials to get you ready for the repair.
Basic Hand Tools
Your toolbox should have a few key hand tools to tackle the ignition switch replacement. A set of screwdrivers—both flathead and Phillips—will help you remove and reinstall screws easily. A socket wrench set comes in handy for loosening bolts that secure the switch or surrounding components.
Don’t forget needle-nose pliers; they are perfect for handling small connectors and wires. Having a multimeter nearby lets you check electrical connections, ensuring the ignition switch is the real issue. Do you have these tools already, or is this a good chance to upgrade your collection?
Replacement Parts
Identifying the correct replacement ignition switch is crucial. Mower models vary, so check your owner’s manual or the part number on your old switch before buying. A compatible ignition switch ensures a perfect fit and reliable performance.
Sometimes, you might also need replacement wiring or connectors if the originals are worn or damaged. Having these parts ready prevents unexpected delays. Ever been stuck halfway through a project because of a missing part? Avoid that frustration by gathering everything beforehand.
Safety Gear
Working on your mower involves electrical components and moving parts, so safety gear is non-negotiable. Wear insulated gloves to protect your hands from electrical shocks and sharp edges. Safety glasses shield your eyes from debris and accidental sparks.
Consider wearing long sleeves and sturdy shoes to guard against cuts or burns. Taking these precautions helps you focus on the repair without worrying about injuries. What safety measures do you usually take when working on machinery?
Safety Precautions Before Repair
Before repairing the mower ignition switch, safety is the top priority. Taking the right precautions protects you from injury and damage. It also ensures the repair goes smoothly without interruptions. Understanding basic safety steps helps create a safe workspace.
Disconnecting The Battery
Always disconnect the mower’s battery before starting any repair. This step stops electrical current flow. It prevents shocks and accidental starting of the engine. Use insulated tools to remove the battery cables carefully. Removing the negative cable first is best practice.
Working In A Well-ventilated Area
Choose a workspace with good air circulation. Gas fumes from the mower can build up and become dangerous. Open doors or windows to allow fresh air in. Avoid working in tight or enclosed spaces. Proper ventilation reduces the risk of inhaling harmful fumes.
Avoiding Electrical Hazards
Wear rubber gloves to protect against electric shocks. Keep tools dry and in good condition. Do not touch electrical parts with wet hands. Check wires and connectors for damage before starting. Avoid loose clothing or jewelry that can catch on parts or cause shorts.

Credit: www.ebay.ca
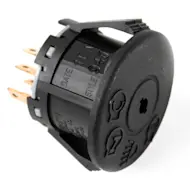
Removing The Old Ignition Switch
Removing the old ignition switch from your mower can be a straightforward task if you take it step by step. The ignition switch is a crucial component, and replacing it can breathe new life into your trusted machine. Whether it’s due to wear and tear or a malfunction, swapping out the old switch can save you from unnecessary frustration and downtime.
Accessing The Switch Panel
First, ensure your mower is turned off and the key is removed to avoid any accidental starts. Locate the switch panel, which is typically positioned near the steering column or dashboard. Carefully remove any protective covers or panels using a screwdriver, if necessary, to reveal the ignition switch. You might be surprised at how accessible it is once you remove these covers.
Detaching Electrical Connections
Next, focus on the electrical connections attached to the ignition switch. These connections are usually secured with clips or small bolts. Gently unplug the wires, taking note of their positions or using your phone to snap a quick reference photo. Ever wondered why some repairs seem easier than others? It’s often about keeping track of these small details!
Removing Mounting Screws
With the electrical connections detached, you can now remove the mounting screws that hold the switch in place. Use the appropriate screwdriver to avoid stripping the screws. As you remove them, keep them in a safe place; a small container or magnet tray works wonders for preventing loss. Have you ever spent more time searching for a dropped screw than on the actual repair?
Once the screws are out, you can effortlessly slide the old ignition switch from its housing, setting the stage for a smooth installation of the new one.
Inspecting And Testing The Switch
Inspecting and testing your mower’s ignition switch is a crucial step when troubleshooting why your mower won’t start. The ignition switch controls the flow of electricity, so even a small fault can prevent your mower from firing up. Taking the time to carefully examine and test this component can save you from unnecessary parts replacement and help you get back to mowing quickly.
Visual Damage Check
Start by removing the ignition switch from your mower. Look closely for any signs of wear, cracks, or corrosion on the switch’s body and terminals. Dirt or rust buildup can disrupt the electrical connection and cause failure.
Check if the wiring connected to the switch is frayed or loose. A broken wire can mimic a faulty switch, so make sure all connections are solid and clean. Have you ever found a tiny crack that was easy to miss but caused all the trouble? That’s why this step matters.
Using A Multimeter
A multimeter is an essential tool for testing electrical components like your ignition switch. Set it to measure resistance (ohms) or continuity, depending on your model.
Touch the multimeter probes to the switch terminals while toggling the switch on and off. The reading will help you determine if the switch allows current to pass when it should. Without a multimeter, you’re guessing in the dark.
Switch Continuity Test
Continuity testing checks if the circuit inside the ignition switch is complete. When you turn the switch to the ‘on’ position, the circuit should close, allowing electricity to flow.
Place the multimeter probes on the switch terminals and turn the switch. A beep or zero reading means continuity exists, so the switch is likely good. No beep or infinite resistance indicates a broken circuit inside the switch, signaling it needs replacement.
Installing The New Ignition Switch
Installing the new ignition switch is a key step in fixing your mower. This process ensures the mower starts and runs smoothly. Follow simple actions to place and connect the switch correctly. Take care to avoid mistakes that could cause electrical issues or failure to start.
Connecting Wires Correctly
Match each wire to the right terminal on the switch. Use the mower’s wiring diagram or take a photo before removing the old switch. Wires usually have different colors for easy identification. Attach each wire firmly to prevent loose connections. Loose wires can cause sparks or stop the mower from starting.
Securing The Switch
Place the switch in its mounting hole carefully. Use screws or clips to hold it tightly in place. The switch should not move or wiggle once fixed. A loose switch can lead to damage or poor contact. Tighten the screws evenly to avoid cracking the plastic parts.
Double-checking Connections
Look over all wire connections again. Confirm each wire is on the correct terminal. Check for any frayed or damaged wires. Ensure no wires touch each other, which can cause short circuits. Test the switch by turning the key before reassembling everything. This avoids extra work if the switch does not work properly.
Testing The Repair
After repairing your mower’s ignition switch, it’s crucial to test the fix thoroughly. This ensures the mower starts smoothly and operates safely. Skipping this step might leave you with a mower that fails unexpectedly or poses safety risks.
Starting The Mower
Turn the ignition key and listen closely. Does the engine crank without hesitation? If it struggles or doesn’t start, there might still be an issue with the ignition switch or related wiring.
Try starting the mower a few times to confirm consistency. Pay attention to any unusual sounds or delays. These clues help you judge whether the repair holds up under normal use.
Checking For Power Consistency
Power consistency matters for smooth operation. Use a multimeter to check voltage at the ignition switch terminals. The readings should remain steady when you turn the key on and off.
Flickering or dropping voltage indicates a loose connection or faulty switch. Think about how your mower performed before the fix—does the power feel more reliable now? This comparison reveals the repair’s success.
Ensuring Safety Features Work
Your mower’s safety features depend on the ignition switch functioning correctly. Test the blade engagement and the brake switch to make sure they respond as expected.
If the blade won’t disengage when you turn off the key, or the mower runs with the brake off, stop immediately. These issues suggest something is still wrong with the ignition system. Your safety can’t be compromised.

Credit: www.youtube.com
Common Mistakes To Avoid
Fixing a mower ignition switch requires care to avoid common mistakes. These errors can cause more damage or even make the mower unsafe. Understanding what to avoid helps save time and money. It also ensures the mower works properly after repair.
Here are common mistakes to watch out for when fixing your mower ignition switch.
Improper Wiring
Wiring the ignition switch incorrectly can stop the mower from starting. It may also cause shorts or damage the electrical system. Always check the wiring diagram before connecting wires. Use the right tools to strip and connect wires securely. Loose or crossed wires lead to poor performance or failure.
Ignoring Safety Steps
Skipping safety steps can lead to injury or electric shock. Always disconnect the mower battery or spark plug before starting repairs. Wear gloves and eye protection to avoid accidents. Work in a dry, well-lit area to see all parts clearly. Safety precautions protect both you and the mower.
Using Incompatible Parts
Using wrong or low-quality parts can cause the ignition switch to fail again. Make sure replacement parts match your mower model and specifications. Genuine or high-quality parts last longer and fit better. Cheap parts may save money but can cause bigger problems later.
Maintenance Tips For Ignition Switch
Keeping your mower’s ignition switch in good shape prevents sudden breakdowns. Proper maintenance helps extend its life and keeps your mower ready to start anytime. Simple care routines make a big difference in performance and reliability.
Regular Cleaning
Dirt and debris can block the ignition switch. Clean it with a soft cloth regularly. Avoid using water or harsh chemicals that may damage the switch. Use a small brush or compressed air to remove dust from tight spaces.
Periodic Testing
Test the ignition switch to ensure it works properly. Turn the key and listen for clicking sounds or check if the engine starts smoothly. Early testing helps catch issues before they become serious problems. Replace the switch if you notice delays or failures.
Protecting From Moisture
Moisture causes rust and electrical shorts in the ignition switch. Store your mower in a dry place. Use a cover to shield it from rain and dew. If the switch gets wet, dry it quickly to avoid damage.
Frequently Asked Questions
How Do I Test A Mower Ignition Switch?
Use a multimeter to check continuity. Turn the switch on and off. No continuity means a faulty switch needing replacement.
What Tools Are Needed To Fix Ignition Switch?
You need a screwdriver, multimeter, and replacement switch. Ensure the mower is off and battery disconnected before starting.
How To Safely Replace Mower Ignition Switch?
Disconnect the battery first. Remove the old switch with a screwdriver. Install the new one and reconnect wires securely.
Why Is Mower Ignition Switch Not Working?
Common causes include worn contacts, loose wires, or corrosion. Testing with a multimeter helps identify the exact problem.
Conclusion
Fixing a mower ignition switch can save time and money. Follow the steps carefully for safety. Test the switch after replacement to ensure it works well. Regular maintenance helps avoid future problems. Stay patient and take your time during the repair.
Small fixes like this keep your mower running longer. Now, you can enjoy a smooth lawn care experience again.


